Important :
Kindly identify your build number and follow the sequence as given in the table below to move to the latest version: (How can I find my Build number?)
For the ServicePacks with Note symbol, extract the *.zip file under the ServiceDesk home directory and then run the UpdateManager.bat and install the *.ppm file which also is extracted under the ServiceDesk home directory. We strongly recommend you to take backups before migrating. This helps you prevent accidental loss of data.
| Current Build | Service Pack | Move to Build |
| 4102, 4103, ... 4111 | 4112 | |
| 4112, 4113, 4114 | 5001 | |
| 5000 | 5000 | |
| 5001, 5002, ... 5011 5500, 5501, ... 5506 | 5507 | |
| 5500, 5501, ... 5507 | 6000 | |
| 6000, 6001, ... 6011 | 6012 | |
| 6012, ... 6015 | 7000 | |
| 7000, 7001, ... 7021 | 7022 | |
| 7022 (new link) | 7500 | |
| 7500, 7501, ... 7513 | 7514 | |
| 7514 | 7600 | |
| 7600 | 7611 | |
| 7611 | 8000 | |
| 8000 | 8027 | |
| 8027 | 8100 | |
| 8100 | 8121 | |
| 8121, 8122, ... 8126 | 8127 | |
| 8121, 8122, ... 8127 | 8200 | |
| 8200, 8201, ... 8211 | 8212 | |
| 8212, 8213, ... 8216 | 8217 | |
| 8214, 8215, 8216, 8217 | 9000 | |
| 9000, 9001, ... 9048 | 9049 | |
| 9046, 9047, 9048, 9049 | 9100 | |
| 9100, ... 9117 | 9118 |
Instructions to apply the Service Pack / Hotfix
- Shut down ServiceDesk Plus Server.
- Run the script UpdateManager.bat (UpdateManager.sh for Linux) in the <ServiceDesk_Plus_Home>/bin folder. This opens the Update Manager tool.
- Click "Browse" to select the Service Pack file (AdventNet_ManageEngine_ServiceDesk_Plus_<Version No>_0_0_SP-x_0.ppm file that you had downloaded) and then click "Install...".
- Follow the on-screen instructions to apply the Service Pack / Hotfix.
- Once the upgrade is complete, start ServiceDesk Plus Server.
Important: for Windows Users :
We have changed the Target to start the ServiceDesk Plus server in
"Windows Start menu -> Programs -> ManageEngine ServiceDesk Plus -> ServiceDesk Server" and ServiceDesk Plus Desktop shortcut icon. This needs to be done by users who have upgraded from any of earlier builds (from 4.0, 5.0, 5010 and below) to ServiceDesk Plus 5.5(5500 and above). This can be changed as follows
- Right click 'ServiceDesk Server' option and choose the Properties option.
- Change the value in Target field from
"{ServiceDesk_home}\jre\bin\javaw.exe -Dproduct.home=. -cp ..\lib\startupclasses.jar;..\server\default\lib\SDUtils.jar com.adventnet.start.ProductStarter StartServiceDeskService ..\server\default\conf\TrayIconInfo.xml"
to
"{ServiceDesk_home}\bin\startSDP.bat" where {ServiceDesk_home} is the ServiceDesk Plus installation directory which will be typically like C:\AdventNet\ME\ServiceDesk directory. - Click "Apply", followed by "OK" button
The step 1 to 3 has to be repeated for the ServiceDesk Plus desktop icon.
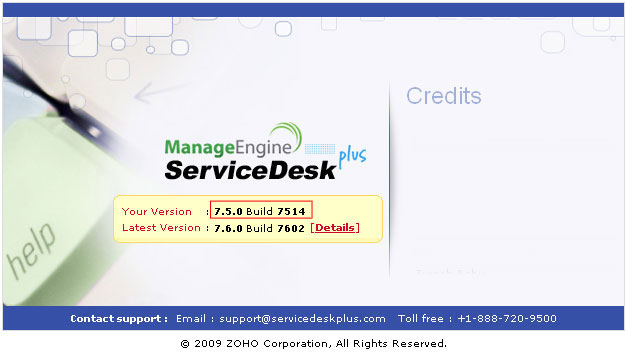
How can I find the Build Number of ServiceDesk Plus?
- In the ServiceDesk Plus web client, click the "About" link on top right of the page.
- You should see the Build number mentioned on the top right of the page.
Check the following image guide to locate the build number.
Need help ?
Want help with upgrading ServiceDesk Plus to the latest version? Contact ServiceDesk Plus Support
