How to configure Mobile Device Manager Plus to make it use MSSQL Server as the database?
Mobile Device Manager Plus extends support for using MS SQL database for storing the configuration and data. This document will explain the steps to configure Mobile Device Manager Plus and MS SQL Server to use MS SQL as the back end database.
The steps to configure are different for new and existing installations. Choose the links below, depending on your requirement:
Note : Mobile Device Manager Plus Supports MS SQL 2005 or later versions.
Fresh Installation
- Install Mobile Device Manager Plus. Do not start the service.
- Perform the steps below from the computer where MS SQL Server is installed,
- Choose Start --> Run and type services.msc.
- Ensure that "SQL Browser" service has been started. If not, start the service.
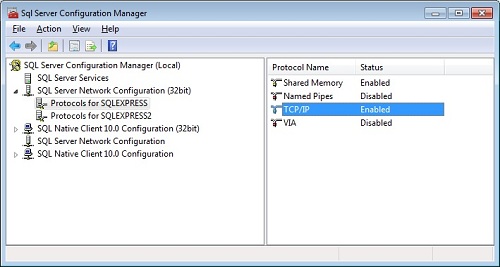
- Open the SQL Server Configuration Manager from the Start menu
- Expand SQL Server Configuration Manager (Local) and navigate to SQL Server Network Configuration.
- Choose the Instance on which you wish to run the database and check if TCP/IP ports are enabled. If not, right-click on TCP/IP and enable it.
You should restart the SQL Service after you enable TCP/IP. Select SQL Server Services from the left pane, right-click the instance and choose Restart.
- From the computer where Mobile Device Manager Plus Server is installed, perform the steps below:
- Execute the script changeDBServer.bat available under <Mobile Device Manager Plus Home>/bin directory. This invokes the Database Setup wizard.
- Select Database Type as SQL Server
- Specify the Host Name where SQL Server is installed
- From the list of available instances, select the instance on which you wish to run the database.
You can choose to authenticate the database connection either using Windows Authentication or SQL Server Authentication. Choose the required authentication and provide the credentials.

Fig: Windows Authentication without data Migration

Fig: SQL Server Authentication without data Migration
- Click the check box to enable NTLM authentication.
- Ensure that you uncheck, the check box "Migrate data from existing database". So that the existing data will be not be migrated to the MSSQl server. So this will be a fresh MSSQL installation.
- Click Test to check whether a connection could be established with the given credential.
- Click Save to save and complete the SQL Server Configuration. It may be noted that it will take a few minutes to configure the settings on the SQL Server.
- Start Mobile Device Manager Plus.
Migrating the data from an old setup
To migrate the Mobile Device Manager Plus data from Mysql to Mssql server, follow the steps mentioned below:
- Stop Mobile Device Manager Plus Server.
- Open command prompt as Administrator.
Change the Database Server to MS SQL
The following steps will explain you, to backup the data from the old server, change the database server and restore the data in the MS SQL database.
- Perform the steps below from the computer where MS SQL Server is installed,
- Choose Start --> Run and type services.msc.
- Ensure that "SQL Browser" service has been started. If not, start the service.
- Open the SQL Server Configuration Manager from the Start menu
- Expand SQL Server Configuration Manager (Local) and navigate to SQL Server Network Configuration.
- Choose the Instance on which you wish to run the database and check if TCP/IP ports are enabled. If not, right-click on TCP/IP and enable it.
You should restart the SQL Service after you enable TCP/IP. Select SQL Server Services from the left pane, right-click the instance and choose Restart.
- From the computer where Mobile Device Manager Plus Server is installed, perform the steps below:
- Open command prompt as Administrator
- Execute the script changeDBServer.bat available under <Mobile Device Manager Plus Home>/bin directory. This invokes the Database Setup wizard.
- Select Database Type as SQL Server
- Specify the Host Name where SQL Server is installed
- From the list of available instances, select the instance on which you wish to run the database.
- You can choose to authenticate the database connection either using Windows Authentication or SQL Server Authentication. Choose the required authentication and provide the credentials.
- Click the checkbox to enable NTLM authentication.
- Click the check box to "Migrate Data from Existing Database". So that the existing data will be migrated to the MSSQl server.
Click Save to save and complete the SQL Server Configuration. It may be noted that it will take a few minutes to configure the settings on the SQL Server.

Fig: Windows Authentication

Fig: SQL Server Authentication
Note :
- One of the best practise recommended is to, Click Test to check whether a connection could be established with the given credential.
- If you get any Error messages such as "Authentication Error", check to verify the correctness of specified credentials.(Do not take a back up of the database again)
- This might take several minutes, the size of your database determines the time taken.
Ensure that the collation for the Mobile Device Manager Plus folder in MSSQL database is set as SQL_Latin1_General_CP1_CI_AS if it is not set, follow the steps mentioned below to change the collation.
- Go to Mobile Device Manager Plus database.
- Right click 'memdm' folder
- Click properties to view the database properties of 'memdm'
Under Maintenance select SQL_Latin1_General_CP1_CI_ASfrom the drop down and click OK.


5. Start Mobile Device Manager Plus.
You can start using Mobile Device Manager Plus which has been migrated from the previous location.