Manage SSH Resources, Keys
- Overview
- Step 1: Discover SSH resources.
- Step 2: Provide credentials to connect to the resource(s).
- Step 3: Enumerate the SSH users in resource(s).
- Step 4: Specify the credentials for each enumerated user for SSH key management.
- Step 5: Import the discovered keys to Key Manager Plus.
- Step 6: Create new keys and deploy them.
- Step 7: Associate existing keys with users and vice-versa. View key-user relationship.
- Step 8: Perform key management operations (edit, rotate, dissociate, delete) and launch direct terminal connections.
- Step 9: Organize SSH resources, keys, and users as groups for bulk management.
Key Manager Plus allows you to manage the entire life-cycle of SSH keys. The process actually starts with the discovery of the SSH resources in the network and follows the flow as detailed below:
Steps indicated above just illustrate the flow of events in Key Manager Plus. It is not necessary that you should follow them in the same order as explained above.
Step 1: Discover SSH resources.
Key Manager Plus enables you to automatically discover the SSH resources present in your network. You can discover the resources anytime as needed or periodically based on scheduled tasks. The discovery options are quite flexible - you can discover a single resource or multiple resources at one go.
Discover Resources On Demand
To discover the resources manually:
- Go to the Discovery tab in the GUI.
- Click the SSH tab.
- Select an option for the type of discovery.
- Hostname/IP address — Enter the name or IP address of the resource to be discovered.
- IP address range — Specify an IP range and discover all the SSH resources falling under the range
- From file — If you have a list of the resources in your network saved as a text file, it can be loaded directly and all of them discovered.
- Subnet — You can also choose to discover resources from specific subnetworks within an IP range using this option.
Note : The file to be imported must be a text file containing the hostname or IP addresses of individual SSH resources, listed on separate lines. Enter the ports to scan for each resource separated from the hostname or IP address by a space, as illustrated below:
0.0.0.0 22
test-username-10 6565
192.168.20.20 7272If you do not specify any port, SSH servers using the default port 22 will be discovered.
- For bulk discovery using IP address range and Subnet options, there is an Exclude IP Address field that allows you to exclude specific resources from being discovered. Specify the IP addresses of the resources that need to be excluded one below another.
- Specify values for the Time out and the Port options.
- Time out: Refers to the number of seconds the application tries to discover the resources (each). The default value is 5 seconds.
- Port: It refers to the port on the end terminal used for SSH communication. Port 22 is used by default for SSH communications.
- Click the Discover button.
When you click the Discover button, you will be redirected to the Discovery Status page where the status of the current discovery instance is updated.

Discover Resources Automatically Through Schedules
Resource discovery can also be scheduled to occur at periodic intervals.
- Click the Schedule tab in the GUI.
- Click the Add Schedule button.
- In the Add Schedule window, enter a name for the schedule and select the type of schedule as SSH Discovery.
- Specify the start and end IP addresses and the port on the end terminal used for SSH communication.
- Select the recurrence type — hourly, daily, weekly, monthly, or once only. Set the starting time, date, or day corresponding to the option chosen.
- Enter the email addresses of the users to be notified.
- Click the Save button.
You will get a message confirming addition of a new schedule.
The result of the schedule execution will get updated in the Schedule audit and the Discovery audit tabs.
The discovered SSH resources, with either manual or scheduled discovery executions, are automatically added to the resources list and can be viewed from the SSH → SSH servers tab in the GUI.
Step 2: Provide credentials to connect to the resource(s).
After discovering the resources, the next step is to provide credentials to establish connection between Key Manager Plus and the resources. This is a one time operation. Key Manager Plus just requires the credentials of any one user to establish connectivity and enumerate all SSH users in the resource. In that case, Key Manager Plus will get key management privileges for that particular SSH user account alone. Subsequently, you can enter the credentials for other users to enable Key Manager Plus to ‘manage’ them. On the other hand, if root credentials are given, Key Manager Plus will not only enumerate all the SSH users, but also gets management privileges over all users.
To enter the user credentials:
- Navigate to the SSH → SSH servers tab in the GUI.
- Click the Credentials icon.
- Key Manager Plus supports connection establishment with resources that utilize either password or key based authentication.
- For resources that utilize password based authentication, enter the username and password of one of the user accounts present in the resource.
- For password-less resources that utilize key based authentication, provide the private key associated with one of the user accounts. You can either browse and upload the user private key from your system or choose from the "Select Key" drop-down if you have already added it to Key Manager Plus' SSH key repository.
- Select the Root/Administrator check box if the credential is that of a root user or an administrator.
- Click the Save button.
When the accurate credential of a particular account is entered, all user accounts available in the resource are automatically enumerated.

Also, you can simultaneously upload credentials for resources in bulk using the Credentials option from the top menu. This works in cases where two or more resources operate with the same credentials.
- Select the required resources and click Credentials option from the top menu.
- In the pop up that opens, provide the required details and click Save.
- The credentials are applied to the selected resources.
Step 3: Enumerate the SSH users in resource(s).
After establishing connectivity, the next step is to enumerate the SSH users in the resource. Once you establish connectivity as explained in step 2 above, Key Manager Plus automatically enumerates all SSH user accounts within that resource.
Step 4: Specify the credentials for each enumerated user for SSH key management.
After enumerating the SSH users from the resource, Key Manager Plus requires the credentials of each user account to commence SSH key management process. If you have specified the root account credentials for any resource in step 2 above, Key Manager Plus automatically gets management privileges for those particular resources.
To enter the password for enumerated user accounts:
- Navigate to SSH → SSH Users tab.
- If the password is the same for all / many user accounts, select the accounts and click the Credential button. Enter the password. This same password is applied for all the selected user accounts.
- If the password differs, click the Credentials icon against the required account and enter the password.
- Click the Save button.
When you click save, you will get a confirmation that the credentials have been updated.

Import SSH user credentials
If you have the list of user credentials in a text file, you can import them to Key Manager Plus.
To import the user credentials from the system:
- Navigate to SSH → SSH Users tab in the GUI.
- Click the Import Credentials icon available in the top-right corner of the window, above the table.
- Click the Browse button and select the text file from the system.
- Click the Import button.
Note : The file to be imported must be a text file with the format given below. For clarity, export a user credential and follow the format used.
Format : Resource name, User name, Password
Step 5: Import the discovered keys to Key Manager Plus.
The discovery and the subsequent connectivity establishment and credential supply processes enumerate the SSH keys associated with the resources. You are now required to import the keys to Key Manager Plus.
As mentioned in step 4, Key Manager Plus requires SSH user credentials for SSH key management. If the credentials are in place, you can import the SSH keys already discovered. To import the key files from the discovered SSH resource:
- Navigate to the SSH >> Discovered Keys tab in the GUI.
- The SSH keys are listed with their details. Select the keys you want to import.
- Click the Import button.
The imported keys can be viewed from the SSH → SSH keys tab.
Note : If the keys are protected with a passphrase, even though the import operation will execute successfully, while associating with user accounts, you need to enter the passphrase to use the key.
Import keys from systems
In addition to the automated discovery of key files from the SSH servers, you can also specify the location, and import the keys present in any system. To import the key files from the system:
- Navigate to the SSH >> SSH keys tab in the GUI.
- Click the Import Keys icon available in the top-right corner of the window, above the table.
- Click the Browse button and select the key file within the system.
- Enter the name and passphrase of the key.
- Enter a Key Comment for your reference.
- Click the Add button to include the key in the repository.

Note : If the key is protected with a passphrase, then the same has to be entered to successfully import the key.
To edit a Key Comment in already imported keys, follow the below steps:
- Navigate to the SSH >> SSH keys tab.
- Select the required key from the repository.
- Click the More drop-down from the top menu, choose Edit and enter the required key comment.
- Select the checkbox Update the comment in the 'authorized_keys' file of the associated user(s) account to apply the updated key comment in the authorized_keys file automatically. This option eliminates the need to update the key comments manually in the associated user accounts.

Note: Key Comment can be edited for only one key at a time.
Step 6: Create new keys and deploy them.
Key Manager Plus also allows you to create new key pairs and deploy them on target systems. The create and deploy feature of Key Manager Plus can be used for one click generation and deployment of keys. Unique key pairs are generated for each user account and the corresponding keys are deployed automatically in user accounts of the target servers.
The SSH key pair can be generated using RSA / DSA algorithms as per the details below:
RSA — 1024, 2048, or 4096 bit keys
DSA — 1024 bit keys.
To create keys:
- Navigate to SSH → SSH keys tab in the GUI.
- Click the Create option.
- In the Create SSH Key window, enter the details of the key, and select the key type and length.
- Click the Create Key button to generate the key pair.
You will get confirmation that the new key has been created.

To view key passphrase:
Administrators can view the passphrases of keys by clicking on the show passphrase icon ( ![]() ) provided at the right end of the keys.
) provided at the right end of the keys.
To create and associate keys with all the user accounts in a discovered resource:
- Navigate to the SSH → SSH servers tab in the GUI to deploy the keys in all its enumerated user accounts. Or else, navigate to the SSH → SSH Users tab and select the user accounts individually.
- Click the Create and Deploy icon in the right corner of the table view corresponding to the required resource.
- Select the key comment, type, and length, and click Deploy button to create key pairs and deploy them simultaneously in all the user accounts of the resource, for which credential is available.

Step 7: Associate created or existing keys with users and vice-versa. View key-user relationship.
After importing / creating keys, you can associate the keys with SSH users.
Note :
- As mentioned in step 2 above, if root user or administrator credential has been provided for a resource, keys can be associated with all enumerated user accounts of the resource.
- If there are no keys available in the Key Manager Plus database, then you will be prompted to create a key during association. Create a key pair and return to these steps.
To associate the created or imported keys with the user accounts of a single resource:
- Navigate to the SSH → SSH servers tab in the GUI.
- Click the SSH users icon in the right corner of the table view.
- Select the user accounts for association.
- Click the Associate button at the bottom of the SSH users window.
- Select a key and again click the Associate button.
You will get a confirmation message that the key association has started and you will be redirected to the Key Association Audit page.

To select a SSH key and associate it directly with the user accounts:
- Navigate to SSH → SSH Keys tab.
- Select a key from the list displayed.
- Click the Associate button.
- In the SSH Users window, select the user accounts and click the Associate button.

Keys can also be created and simultaneously associated with the user accounts. To do this:
- Navigate to the SSH → SSH servers tab in the GUI.
- Click the SSH users icon in the right corner of the table view.
- Select the user accounts.
- Click the Associate button at the bottom of the resource users window.
- In the new window, click the Create Key icon beside the Select Key drop-down list.
- Enter details of the key and click the Create Key button.
- Select the new key from the Select Key list and click the Associate button.
You can view a trace of the key to its resource and the user accounts. To trace this key to user relationship:
- Navigate to the SSH → SSH Keys tab.
- Click the desired key name.
- Click the Association graph icon in the top-right corner of the window.
A pictorial representation of the relationship between the key and resource will be displayed in the form of a map. When you click the resource name, the user accounts of the resource can be viewed, and you can connect with the user accounts associated with the selected key.

Step 8: Perform key management operations (edit, rotate, dissociate, delete) and launch direct terminal connections.
Rotate SSH Keys
You can configure Key Manager Plus to automatically rotate the SSH keys at periodic intervals. With a single click, all the deployed keys can be replaced. The keys can be rotated based on a schedule, or anytime based on your need.
Manual Key Rotation
To rotate the keys manually:
- Navigate to SSH → SSH Keys tab.
- Select the keys to be rotated.
- Click the Rotate option.
A confirmation message will be displayed and you will be redirected to the Key Rotation audit page where the status of rotation is updated.
Note : Only the keys which have already been associated with user accounts of resources can be rotated.
Scheduled Key Rotation
To schedule the rotation of keys:
- Click the Schedule tab in the GUI.
- Click the Add Schedule button.
- In the Add Schedule window, enter a name for the schedule and select the type of schedule as Key rotation from the drop-down list.
- Select the keys to be rotated.
- Select the time and date for rotation. Enter the email addresses of the users to be notified.
- Click Save.
The result of the schedule execution will get updated in the Schedule audit and the result of the rotation of the keys will get updated in the Key Rotation audit.
Dissociate Keys From SSH Users
When a SSH user leaves the organization or is provided temporary privileged access, you can dissociate the keys associated with the user to and discontinue access. Until you dissociate all the SSH keys, you cannot delete the user account nor the resource.
To select the keys and dissociate it from the users accounts:
- Navigate to the SSH → SSH Keys tab.
- Select a single key which has to be dissociated.
- Click the Dissociate button from the More drop-down list.
- If the key is associated with a single user account click OK in the confirmation dialog box to dissociate the key.
- If the key is associated with multiple user accounts, select the user accounts from which the key has to be dissociated and click the Dissociate button in the Dissociate Users window.
To select the user accounts and dissociate keys from it:
- Navigate to the SSH → SSH Users tab.
- Click Dissociate from the More option
- If the user account is associated with a single key, select OK in the pop-up window.
- If more than one key is associated with the selected user, select the keys which have to be dissociated and click the Dissociate button in the Dissociate Keys window.
Note : When you select and delete the user accounts enumerated in Key Manager Plus, the SSH keys associated with them are automatically dissociated.
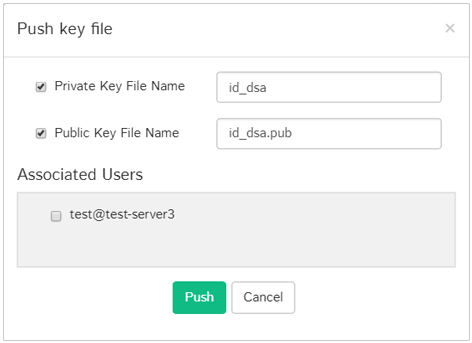
Push Keys to remote user accounts:
In addition to deployment, Key manager Plus allows you to push a private key or a public key or both onto its associated users.
To push a key file to remote user accounts,
- Click on the Push Key to User icon (
 ) at the right extreme of the selected key.
 - Select whichever key needs to be pushed (private, public or both), provide the appropriate key names, select the required associated users and click Push.
- The key file(s) is/are pushed to the selected users.
This feature is also available as a part of Key Rotation schedule. After the scheduled key rotation is performed and fresh key pairs are created and deployed, you can automatically push either the private key or both the private and public keys onto its selected associated users by enabling the 'push key to user' option instead of pushing the key files manually after every scheduled rotation.
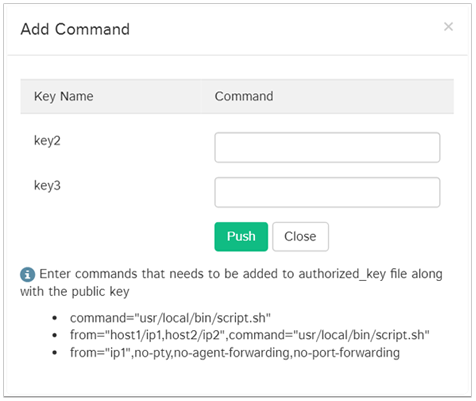
Add commands and restrict host per key
You can add commands to specific user accounts, thereby providing an additional layer of restriction enabling them to only execute the commands on establishing connection with the host. Also you can predefine appropriate key to user relationship by specifying the IP address of the user in the appropriate format (as specified below).
To add command to a public key,
- Navigate to SSH >> SSH Users.
- Click on Add Command from the More option.
- An Add Command dialog box opens up, where you can add commands to be executed in the following format. i.e.,(command="usr/local/bin/script.sh").
To restrict hosts for a key, click on Add Command and provide the name or IP addresses of the hosts in the following format. i.e.,(from="host1/ip1,host2/ip2")
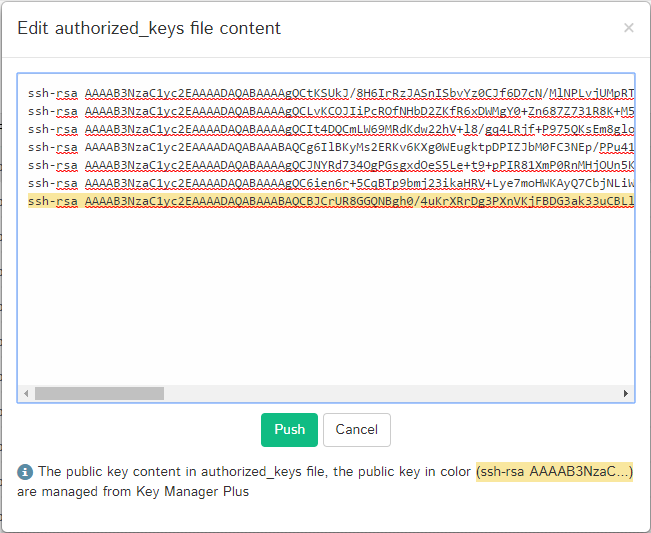
Edit authorized_keys file
You can fetch authorized_keys files from various user accounts, edit the key content and push them to respective user accounts from Key Manager Plus.
To do this,
- Navigate to SSH → SSH Users tab
- Select the required user account and click on Edit Key Authorization File icon (
 ) from the extreme right
 - A window opens displaying the list of public keys in the authorized_keys file of the respective user. The keys that are managed using Key Manager Plus are highlighted.
- You can now edit the contents of the keys displayed, and deploy them back to the respective user accounts by clicking the Push button.
Secure File Transfer
You can securely transfer files from your system to specific user accounts using Secure Copy Protocol (SCP) in Key Manager Plus. To perform secure file transfer,
- Navigate to SSH → SSH Users
- Select the user account to which the file has to be transferred.
- Click More on the top menu and select Transfer File.
- Browse and upload the file from your system and specify the path in the user account where the file has to be placed.
- Click Transfer. The file is successfully transferred to the specified path in the user account chosen.
Note :
- Since file transfer using SCP is essentially based on SSH, you have to initially associate SSH keys to the required user accounts before transferring files.
- Currently, you can upload a maximum file size of 16MB per transfer.
Delete Keys
When you try to delete the SSH keys from Key Manager Plus repository, they are first dissociated automatically from their user accounts. Key deletion fails for the SSH keys that are not dissociated from all their user accounts.
To delete the SSH Keys:
- Navigate to the SSH → SSH Keys tab.
- Select the keys to be deleted.
- Click the Delete button from the More drop-down list.
- Click OK in the confirmation window.
Launch Terminal Connection
Once you have associated a key with the respective user accounts, you can launch direct connection to the server via Key Manager Plus. You can connect directly from the SSH → SSH Users tab, by clicking the Connect icon against the required user. You can also navigate to the SSH → SSH Servers, or the SSH → SSH Keys tabs, and drill down to the user accounts associated, and then click the Open Connection icon.
A new window will open up with connection established with the required server, using the selected user account.
Step 9: Organize SSH resource, keys, and users as groups for bulk management.
Key Manager Plus gives the provision to create groups of resources for easy organization and to carry out operations in bulk. You can assign, delete, or modify the group similar to working with a single resource.
The list of items available in a group is enumerated in their respective tabs. You can drill down to the individual items by clicking the name of a group.
SSH Resource Group
Create Resource Groups
To create a resource group:
- Click the Resource group icon in the top-right corner of the SSH → SSH servers tab
- Click the Add group button. You will be redirected to the Add resource group window.
- Enter the name of the group. Take care while choosing the name since it cannot be edited later.
- You can choose the resources to be added
- in a group in 2 ways:
- By Specific resource — Select the resources to be added to the group, individually.
- By Criteria— This serves as dynamic resource grouping. You will specify the exact criteria based on which you want to create the group. Here, you have many options to choose from - you can search for resources based on host name, ip address etc. and filter the search in fine-grained manner based on the criteria such as "contains", "does not contain", "equals" "not equal", "starts with" and "ends with". Click the Matching Resources button at the bottom-right corner of the window to see the corresponding resources.
Note : If you select the By Criteria option, the conditions specified are applicable to resources to be discovered in future too. If any of the resources match the criteria, they will be automatically included into the new group.
- Click Save.

Edit Resource Groups
To make changes to an existing resource group:
- Click the Resource group icon in the top-right corner of the SSH → SSH servers tab.
- Click the Edit icon present in the right corner of the table view.
- You can change the resource selection type and edit the resources available in a group or add, modify, or delete, the filters applicable to a group.
Once you make changes to the group and save, a message will be displayed confirming the update of the changes.
Note : The name of the group cannot be modified. However, you can add or modify the description and the list of resources.
Delete Resource Groups
You can delete the resource groups provided they are not assigned to any user at the time of deletion.
To delete a resource group:
- Click the Resource group icon in the top-right corner of the SSH → SSH servers tab.
- Select the resource groups.
- Click the Delete button.
A pop-up window will appear to make sure that the selected resources are to be deleted. Click OK to delete the groups.
Note : You will not be able to delete resource groups that are currently assigned to a Key Manager Plus user account.
SSH key group management
Create Key Groups
To create a group of SSH keys:
- Click the Key group icon in the top-right corner of the SSH → SSH keys tab.
- Click the Add group button. You will be redirected to the Add key group window.
- Enter the name of the group. Take care while choosing the name since it cannot be edited later.
- You can choose the resources to be added in a group in 2 ways:
- By Specific key — Select the keys to be added to the group, individually.
- By Criteria — This serves as dynamic key grouping. You will specify the exact criteria based on which you want to create the group. Here, you have many options to choose from - you can search for specific keys based on its name, type, length, or creator, and filter the search in a fine-grained manner based on the criteria such as "contains", "does not contain", "equals" "not equal", "starts with" and "ends with". Click the Matching Keys button at the bottom-right corner of the window to see the corresponding keys.
Note : If you select the By Criteria option, the conditions specified are applicable to keys that are discovered later too. If any of the those keys match the criteria, they will be automatically included into the new group.
- Click Save.
In addition, you can directly select individual keys from the SSH → SSH Keys tab and click the Create Group button for faster group creation.

Edit Resource Groups
Edit Key Groups
To make changes to an existing key group:
- Click the Key group icon in the top-right corner of the SSH → SSH keys tab.
- Click the Edit icon present in the right corner of the table view.
- You can change the key selection type and edit the keys available in a group or add, modify, or delete the filters applicable to a group.
Once you make changes to the group and save, a message will be displayed confirming the update of the changes.
Note : The name of the group cannot be modified. However, you can add or modify the description and the list of keys available in it.
Rotate keys of a key group
To rotate all the keys of a key group:
- Navigate to the SSH → SSH keys tab.
- Click the Key Group icon in the top-right corner of the screen.
- Select the key groups and click the Rotate button.
You will be redirected to the Key rotation audit window where the status of key rotation is updated.
Delete Key Groups
To delete a key group:
- Click the Key group icon in the top-right corner of the SSH → SSH keys tab.
- Select the key groups.
- Click the Delete button.
A pop-up window will appear to make sure that the selected groups are to be deleted. Click OK to delete the groups.
SSH User Group management
Create SSH User Groups
To create a group of SSH users:
- Click the User group icon in the top-right corner of the SSH → SSH users tab.
- Click the Add group button. You will be redirected to the Add user group window.
- Enter the name of the group. Take care while choosing the name since it cannot be edited later.
- You can choose the resources to be added in a group in 2 ways:
- By Specific user — Select the users to be added to the group, individually.
- By Criteria — This serves as dynamic user grouping. You will specify the exact criteria based on which you want to create the group. Here, you have many options to choose from - you can search for specific users based on its user name, host name or IP address, and filter the search in a fine-grained manner based on the criteria such as "contains", "does not contain", "equals" "not equal", "starts with" and "ends with". Click the Matching Users button at the bottom-right corner of the window to see the corresponding users.
Note : If you select the By Criteria option, the conditions specified are applicable to users that are discovered later too. If any of the those users match the criteria, they will be automatically included into the new group.
- Click Save.
In addition, you can directly select individual users from the SSH → SSH Users tab and click the Create Group button for faster group creation.

Edit User Groups
To make changes to an existing user group:
- Click the User group icon in the top-right corner of the SSH → SSH users tab.
- Click the Edit icon present in the right corner of the table view.
- You can change the user selection type and edit the users available in a group or add, modify, or delete the filters applicable to a group.
Once you make changes to the group and save, a message will be displayed confirming the update of the changes.
Note : The name of the group cannot be modified. However, you can add or modify the description and the list of users available in it.
Enter credentials
To enter the credentials and apply it to all the users of a group:
- Navigate to the SSH → SSH Users tab.
- Click the User Group icon in the top-right corner of the screen.
- Select the user groups and click the Credential button.
- Enter the Login Password that is applicable to all the users in the selected groups, and click Save.
Associate key
To associate single key with all the users of a group:
- Navigate to the SSH → SSH Users tab.
- Click the User Group icon in the top-right corner of the screen.
- Select the user group and click the Associate button.
- Select the key and click the Associate button in the Public key association window.
You will be redirected to the SSH key window wherein the status of association is updated.
Create and deploy
You can use the Create and Deploy feature of Key Manager Plus for one click generation and deployment of keys. Unique key pairs are generated for each user account and the corresponding keys are deployed automatically in user accounts of the target servers.
This feature can be applied to create keys and deploy them across all the user accounts of a user group as well. To create and deploy keys for user groups:
- Navigate to the SSH → SSH Users tab.
- Click the User group icon in the top-right corner of the window.
- Select the user groups and click the Create and Deploy button.
- Select the details of the key and click the Deploy button in the Create and Deploy window.
The status of the key deployment can be viewed from the Audit tab in the GUI.
Delete User Groups
To delete a group of users:
- Click the User group icon in the top-right corner of the SSH → SSH users tab.
- Select the user groups.
- Click the Delete button.
A pop-up window will appear to make sure that the selected groups are to be deleted. Click OK to delete the groups.
Miscellaneous Operations
Manage Users without Credentials
If you want to manage user accounts without entering their respective credentials:
- Navigate to the SSH → SSH servers tab in the GUI.
- Click the SSH Users icon against the required resource.
- Click the Add User icon in the top-right corner of the SSH Users pop-up window.
- Enter the user name and click the Save button to add the user account to the resource.
Once the user account is added to the resource, you can proceed with the key association process as described from step 6 above.
Manual User Enumeration
With the addition of users in the remote system, use the Enumerate option to reflect subsequent changes in Key Manager Plus. To enumerate the appended SSH user accounts of the discovered resource:
- Navigate to the SSH → SSH servers tab in the GUI.
- Select single resource.
- Click the Enumerate button.
A message will be displayed confirming the start of the enumeration operation.
Customize User home directory
You can customize the home directories of the users, i.e, the location where the public key is to be deployed. To do this:
Navigate to the SSH → SSH Users tab.
- Click the Edit User Path from the More dropdown.
- Enter the modified path and click Save.
You can modify the directory for a group of users by navigating to the User Group tab from the SSH → SSH Users tab.
Export SSH Keys
To export key files by selecting them from the resources with which they are associated :
- Navigate to the SSH → SSH servers tab in the GUI and go to the Resources header tab.
- Click the name of the resource in which the key is deployed.
- Click the Export SSH key icon available in the right corner of the table view.
To export the key files selecting each key:
- Navigate to the SSH → SSH Keys tab.
- Click the Export SSH key icon available in the right corner of the table view corresponding to the required key.
- Select the destination folder and file name and click save.
Note : Even while exporting, the passphrases used to protect the keys are still in effect. That is, if the keys are to be used elsewhere, the passphrases have to be provided.
Export SSH user credentials
To export the user credentials from Key Manager Plus to the system:
- Navigate to SSH → SSH Users tab in the GUI.
- Select the users whose credentials you would like to export.
- Click the Export Credentials icon available in the top-right corner of the window above the table.
- Select the destination directory and click Save.
Note : While exporting, only the resource name and user name are exported while the password is not.
Delete SSH users
When a user account is deleted, first any associated keys are dissociated from them. You will not be able to delete the user accounts until all SSH keys are dissociated from them.
To delete a user account:
- Navigate to the SSH → SSH users tab.
- Select the user accounts.
- Click the Delete button.
Note : If a user account is deleted, it is no longer enumerated within a resource. To list a user account deleted from Key Manager Plus (but still available in the remote system), the resource will have to be re-enumerated.
Delete resources
To delete a resource:
- Navigate to the SSH → SSH servers tab in the GUI
- Select the resource(s) that need to be deleted and click Delete from the top menu.
- You can choose to either dissociate or retain the SSH keys associated with the user accounts present in the resource. Check "Delete without dissociating key" option to delete the selected resources without dissociating the keys associated with any of its user accounts.
- Click OK in the confirmation pop-up window. The selected resources are deleted.
Note : If a user account is deleted, it is no longer enumerated within a resource. To list a user account deleted from Key Manager Plus (but still available in the remote system), the resource will have to be re-enumerated.
SSH Key audits
Audits are generated when SSH keys are associated or rotated using Key Manager Plus. These reports are available in the right-top corner of the SSH → SSH Keys tab.
- Key Association audit — View the result of the spontaneous, and scheduled, key association operations executed using Key Manager Plus
- Key Rotation audit — View the status of the spontaneous, and scheduled, key rotation operations executed using Key Manager Plus.
View SSH key history
Using Key Manager Plus you can view the history of each SSH key, from the moment it was created or imported, and the subsequent rotations along with time-stamps.
To view the history of any key:
- Navigate to the SSH → SSH Keys tab.
- Select a single key.
- Click the Key History button.
Export discovered keys report
A report of the discovered keys can be exported as PDF, or to an email id. To export the report:
- Navigate to the SSH → Discovered keys tab in the GUI.
- Select a single key.
- Click the Export button. You can export the report to the system as PDF file, or to desired email addresses.
- PDF — Export and save the report of the discovered keys as a PDF in the system.
- Email — Specify the email addresses to which the report of the discovered SSH keys is to be exported.