产品安装与使用入门
内容
- 概述
- 必备条件
- 系统要求
- 安装企业密码管理软件
- 开启及关闭
- 连接到Web界面
- 使用MS SQL服务器作为后台
- 在PMP中将数据从 MySQL迁移至MS SQL服务器
- 快速入门指南
- 管理PMP加密Key
- PMP使用的端口
- 许可
- 将PMP的安装从一台机器移动到另一台机器或在同一台机器上移动
- MSP版本
概述
欢迎使用ManageEngine企业密码管理!
这部分将会介绍如何在您的系统中安装企业密码管理(PMP)。同时也将介绍PMP所需的系统配置、安装方法、启动及关闭,以及在成功开启服务器后如何连接到web界面的方法。
必备软件
使用PMP无需安装其他软件。以下标准系统(硬件和软件)配置要求和一个外部邮件服务器(SMTP)对于PMP服务器的功能和发送邮件通知来说是必不可少的。
系统配置要求
以下表格中列出了PMP所需的最低硬件及软件配置要求:
| 硬件 | 操作系统 | 数据库 | Web客户端 |
|---|---|---|---|
内存
硬盘
|
Windows
Linux
备注:企业密码管理可以在以上操作系统的虚拟机上正常运行 |
|
HTML客户端要求在系统中安装以下浏览器中的一种:
** PMP is optimized for 1280 x 800 resolution and above. |
PMP的构成
PMP包含以下组成部分:
安装PMP
在Windows中
- 下载并打开 ManageEngine_PMP.exe
- 安装向导将会在整个安装过程中为您提示。
- 选择安装目录——在默认状态下,它会被安装在C:/ManageEngine/PMP目录下;此后,这个安装路径可以被称为 "PMP_Home"
- 最后,您可以看到两个复选框-一个用来浏览ReadMe文件,另外一个用于在安装之后立即启动服务器;如果您选择立即启动服务器,那么它会在后台进行启动。
- 如果您选择稍后启动服务器(安装结束后),您可以从 开始 >> 程序 >> ManageEngine Password Manager Pro 中进行启动
- 在开始菜单中,您还可以执行如:停止服务器和卸载产品等其他操作。
在Linux中
- 下载Linux版ManageEngine_PMP.bin
- 使用命令 chmod a+x <file-name> 来分配可执行权限
- 执行以下命令:./<file_name>
- 按照屏幕上出现的说明进行操作
- PMP即可被安装在您机器中的指定位置。此后,这个安装路径可被称为"PMP_Home".
开启及关闭PMP
在Windows中
| 使用开始菜单 | 使用托盘图标 |
|---|---|
|
从Start >> Programs >> Password Manager Pro菜单中,您可以:
|
当您安装PMP之后,在windows任务栏右下角的托盘区域会出现这个PMP的图标 右键点击该托盘图标并选择想要的执行的操作 |

在Linux中
连接到Web界面
自动开启浏览器
服务器成功开启后,浏览器就会自动打开到PMP登陆界面。由于通过HTTPS协议连接,您将会收到提示接受安全证书。点击“是”,在登陆页面输入用户名和密码并点击回车键。对于未做配置的设置,默认的用户名和密码都将是“admin”。每次启动服务器,浏览器都会自动开启。
手动开启Web客户端
在windows中,您也可以在Windows托盘中手动登陆web客户端。右键点击PMP托盘图标并点击“PMP Web控制台”。浏览器会自动打开到PMP登陆界面。由于通过HTTPS协议连接,您将会收到提示接受安全证书。点击“是”,在登陆页面输入用户名和密码并点击回车键。对于未做配置的设置,默认的用户名和密码都将是“admin”。每次启动服务器,浏览器都会自动开启。
在Linux中, 打开浏览器并访问以下URL
https://<hostname>:portnumber/
主机名称 - 正在运行Password Manager Pro的主机名称;默认 端口 - 7272
示例 https://localhost:7272
在远程主机上连接Web客户端
如果您想要在另外一台机器上连接web客户端,而不是在PMP正在运行的机器上连接,那么请打开浏览器,访问以下URL。
https://<hostname>:port
由于通过HTTPS协议连接,您将会收到提示接受安全证书。点击“是”,在登陆页面输入用户名和密码并点击回车键。对于未做配置的设置,默认的用户名和密码都将是“admin”。每次启动服务器,浏览器都会自动开启。
使用MS SQL服务器作为后台
PMP支持PostgreSQL、MySQL和MSSQL数据库作为后台。PostgreSQL数据库在默认状态下是与产品绑定在一起的。产品配置为运行PostgreSQL。如果您希望使用MS SQL数据库,请按照以下步骤进行配置:
请注意:
- MS SQL服务器只支持在PMP6400版本中作为后台。较早的版本中不支持运行MS SQL服务器。
- 现在, PMP还不支持从PostgreSQL迁移数据到MS SQL数据库。也就是说,如果您已经使用PostgreSQL作为PMP的后台,而且已经在数据库中存储过数据,那么这些数据将不能迁移到MSSQL服务器中。
- 如果您正在使用的PMP是较早的用MySQL作为后台数据库的版本,那么则可以支持数据迁移。
使用 MS SQL服务器的步骤
为保证更高的安全级别,PMP已配置为只通过SSL连接到SQL服务器。
步骤汇总:
- 创建SSL证书并将其安装在Windows证书库(该Windows服务器为正在运行SQL服务器的windows服务器)
- 获取第三方证书颁发机构颁发的证书或者使用自签名证书
- 将SSL证书导入到PMP
- 在SQL服务器中启用SSL加密
- 配置PMP连接到SQL服务器
步骤1 & 2: 创建SSL证书并将其安装在Windows证书库(该Windows服务器为正在运行SQL服务器的windows服务器)
在尝试用SQL服务器连接PMP之前,您需要在SQL服务器中启用SSL加密。在这里,您可以创建一个SSL证书,然后让一个第三方证书颁发机构(CA)去做认证,或者 也可以自行认证。
选项1:
创建证书并由第三方证书颁发机构进行认证:
您可以使用openssl创建证书,共分为以下两步:生成私人密钥和生成证书。使用以下命令创建证书。
Generate private key
openssl genrsa -des3 -out server.key 2048
生成证书请求
当出现如下提示时,请使用服务器私人密钥来创建一个证书请求。 输入密码口令,公用名,主机名称或者IP地址。
openssl req -new -key server.key -out server.csr
在这里,通用名称指的是SQL服务器的正式域名(FQDN)。
- 在生成证书之后,您需要让第三方证书颁发机构(简称CA)如:VeriSign, Thawte, RapidSSL给您的证书做认证,或者您也可以自行认证。在以下的内容中将会对这两种方式做进一步的介绍。请根据您的环境选择一种:
- 一些主要的CA有:Verisign (https://verisign.com), Thawte (https://www.thawte.com), RapidSSL (https://www.rapidssl.com). 更多关于证书签名请求的信息,请查看这些证书颁发机构的文档及网站。另外,需要提示的是:CA对认证这一过程是要收取费用的。
- 通常验证的过程需要几天的时间,到时您会收到已签署的 服务器SSL证书 以及 CA的根证书 的.cer文件
- 服务器证书需要安装在运行SQL服务器的机器上,CA的根证书会安装在PMP服务器上。
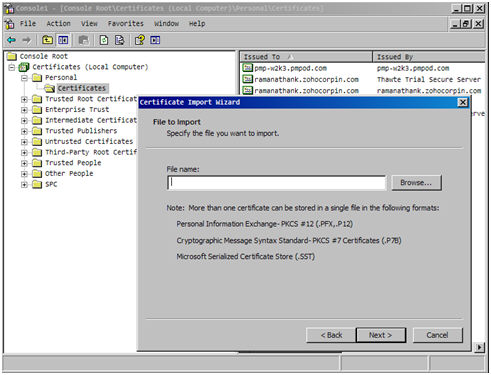
在运行SQL服务器的机器上安装服务器证书。您可以使用MMC按照如下步骤操作:
- (在正在运行SQL服务器的机器上)点击开始 >>> 运行 打开MMC控制台。在“运行”对话框中输入: MMC
- 在控制台菜单中,点击添加/删除管理单元。选择“证书”,再次点击添加。您将会收到提示:该管理单元将始终为下列账户管理证书:“我的账户”,“服务账户”,“计算机账户”,选择 计算机账户.
- 选择 证书(本地计算机) >> 个人的 >> 证书
- 右键点击 证书 >> 点击 所有任务 >> 导入
- 浏览并选择已安装的证书
在PMP中安装CA的根证书
- 复制CA根证书并粘贴至 <Password Manager Pro Installation Folder >/bin 目录下
在<Password Manager Pro Installation Folder>/bin 目录中, 执行以下命令:
importCert.bat <以上提到的已复制的根证书名称>- 这样就把证书添加到了PMP证书库中。
选项2:
创建一个自签名证书(self-signed certificate)
如果您想要创建一个自签名证书并使用,您需要在已安装SQL服务器的机器上按照如下步骤操作:
- 在安装了SQL服务器的机器上执行以下命令:
makecert.exe -r -pe -n "CN=pmptestlab.manageengine.com" -b 01/01/2011 -e 01/01/2036 -eku 1.3.6.1.5.5.7.3.1 -ss my -sr localMachine -sky exchange pmptestlab.manageengine.com.cer
在这里,对于CN部分,请输入SQL服务器的正式域名(FQDN)来代替示例中的 pmptestlab.manageengine.com. - 以上命令将会在您的本地库中安装一个自签名证书。也会将证书存储在文件pmptestlab.manageengine.com.cer中
在PMP中安装服务器证书
- 复制服务器证书并将其粘贴到<Password Manager Pro Installation Folder>/bin 目录下
- 在 <Password Manager Pro Installation Folder>/bin
目录中, 执行以下命令:
importCert.bat <name of the server certificate> - 这样就把证书添加到了PMP证书库中。
步骤3: 在SQL服务器中启用SSL加密
如何在SQL服务器中启用SSL:
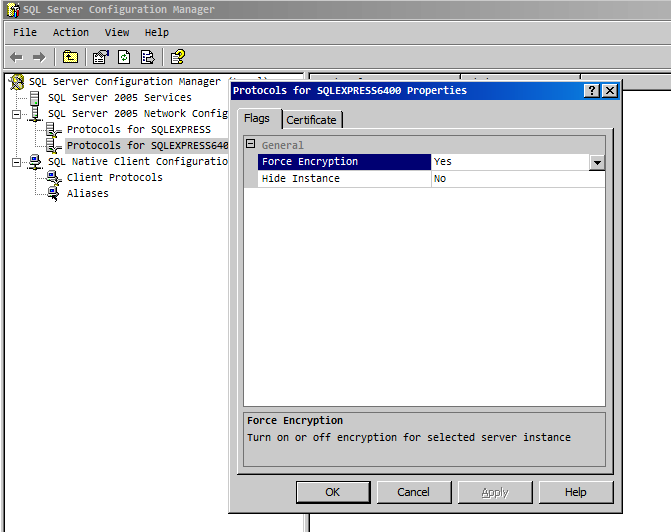
- 在正在运行SQL服务器的机器上,点击 开始, 在Microsoft SQL服务器程序组中, 点击 配置工具, 然后点击 SQL服务器配置管理器.
- 扩展SQL服务器网络配置,右键点击您想要使用的服务器协议,然后点击 属性。(该协议是工具左侧面板中的协议选项,不是右侧面板中的某一个具体协议。)
- 在 证书标签下,配置数据库引擎(Database Engine)来使用证书。
- 当服务器引擎的强制加密选项设置为“是”时,所有的客户端和服务器通信都将被加密,不支持加密的客户端将被拒绝访问。
- 当服务器引擎的强制加密选项设置为“否”时,客户端应用可以请求加密,但不是必需的。
- 当您更改了强制加密设置之后,必需重启SQL服务器。

请参考微软知识库中关于“为SQL服务器配置SSL”的章节来了解更多详情。https://msdn.microsoft.com/en-us/library/ms189067.aspx
步骤4:在PMP中执行ChangeDB.bat
(重要提示:如果您正在使用装有MySQL的PMP软件,希望将数据迁移到MS SQL服务器中,请跳过这步,继续到下一部分)
现在,您需要通过编辑文件ChangeDB.bat (Windows)或者ChangeDB.sh (Linux)来向PMP提供SQL的详情。
- 导航至<Password Manager Pro Installation Folder>/bin 文件夹并执行ChangeDB.bat (Windows) 或 sh ChangeDB.sh (Linux)
- 选择 '“服务器类型”' 为SQL服务器并输入其他值。
- 主机名: 安装MSSQL服务器的机器名称或者其IP地址
- 端口: PMP与数据库连接的端口号。默认是1433。由于PMP只通过SSL模式与MSSQL连接,建议您创建一个专门的数据库运行一个特定的端口供PMP使用。
- 数据库名称: PMP数据库的名称。默认名称是 "PassTrix"。如果您想要更改为其他名称,可以在这里进行更改。PMP将会生成Master Key, Symmetric Key等等。
- 认证: 您想要连接SQL服务器的方式。The way in which you would like to connect to the SQL server. If you are connecting to the SQL server from Windows, you have the option to make use of the Windows Single Sign On facility provided PMP service is running with a service account, which has the privilege to connect to SQL server. In that case, choose the option "Windows". Otherwise, select the option "SQL". It is recommended to choose the option 'Windows' as the username and password used for authentication are not stored anywhere.
- User Name and Password: If you have selected the option "SQL", specify the user name and password with which PMP needs to connect to the database. The username and password entered here will be stored in database_params.conf file in PMP. So, you need to take care of hardening the host.
Here, you have the option to use even your Windows login credentials, if you are connecting to the database from Windows. In this case, you need to enter the username as <domain-name>\<username> - Encryption Key: The key with which your data is to be encrypted and stored in the SQL server. You may either leave it "Default" making PMP to generate a key. If you want to have your custom key, select the option "Custom".
-
If you have selected the option "Custom:" If you have chosen the option 'Custom', you need to create a new database, create Master Key, create Certificate (this will be certificate name) and Create the Symmetric Key using AES 256 encryption.
You need to do the following steps:
Create Database -> For details, refer to https://msdn.microsoft.com/en-us/library/aa258257(v=sql.80).aspx
Create Master Key -> For details, refer to https://technet.microsoft.com/en-us/library/ms174382.aspx
Create Certificate -> For details, refer to https://msdn.microsoft.com/en-us/library/ms187798.aspx
Create Symmetric Key -> For details, refer to https://msdn.microsoft.com/en-us/library/ms188357.aspx
After doing the above, you need to provide certificate name and symmetric key name in the GUI. - Finally, click "Test" to ensure that the connection settings are proper and then click "Save"
Important Note:
After performing the above steps, navigate to <Password Manager Pro Installation Folder>/conf directory and move the masterkey.key file to a secure location. SQL Server encrypts data with a hierarchical encryption and key management infrastructure. Each layer encrypts the layer below it by using a combination of certificates, asymmetric keys, and symmetric keys. One among them is the Database Master Key, which in turn is created by Service Master Key and a password. This password is stored in PMP under <Password Manager Pro Installation Folder>/conf directory in a file named masterkey.key. It is highly recommended that you move the masterkey.key file to a secure location. This is to ensure data security.Take care to keep this key safe. You will require it while performing High Availability and Disaster Recovery. If you lose this key, you will have to configure MS SQL server setup all over again.
For more details on encryption and key management in MS SQL, refer to this MSDN document https://msdn.microsoft.com/en-us/library/ms189586.aspx
Migrating Data from MySQL/PostgreSQL to MS SQL Server (applicable only for PMP builds 6401 and later)
If you are already using PMP with MySQL/PostgreSQL and wish to use MS SQL as backend database, you may follow the steps below to migrate the data. (These steps are only migrating the data from MySQL to MS SQL server. You should have already completed steps 1, 2 and 3 above to use MS SQL as backend database)
Important Note:
Before trying database migration, please take necessary precautions with regard to the following aspects:
1. Personal Password Management
- n case, you / other users in your organization have used 'Personal Password Managerement' in PMP with the option of specifying own encryption key, which is NOT stored in PMP, the above migration procedure will NOT take care of migrating the personal passwords. Users will have to be advised to use the 'Export Passwords' option in the personal passwords section before this migration is attempted.
2. Bundled Database Only
- PMP provides the migration option only if your current PMP installation uses the database bundled with the prooduct. In case, you are using an external database, this procedure does NOT apply.
Step 1
- Take a copy of the entire Password Manager Pro Installation folder and keep it somewhere. If something goes wrong with data migration, this will serve as a backup copy.
- Shutdown PMP server. Also, make sure that the mysqld / postgres process is not running
Step 2
- Navigate to <Password Manager Pro Installation Folder>/bin folder and execute MigrateDB.bat (Windows) or sh MigrateDB.sh (Linux). In the pop-up, select to read the "Best Practices Guide" first and later choose the option "Go to Migration Set Up".
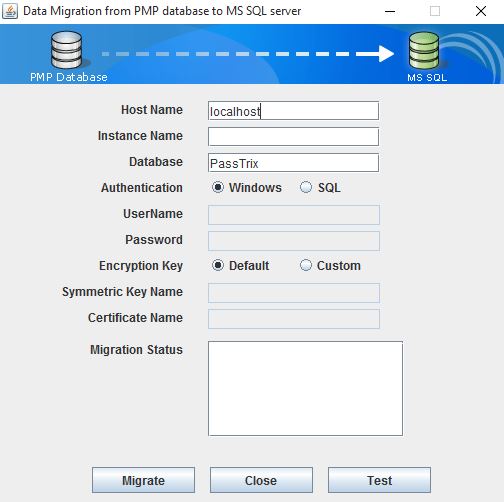
In the window that opens up, enter the details:
- Host Name: The name or the IP address of the machine where MSSQL server is installed.
- Port: The port number in which PMP must connect with the database. Default is 1433. Since PMP connects to MSSQL only in SSL mode, it is recommended that you create a dedicated database instance running in a specific port for PMP.
- Database Name: Name of the PMP database. Default is "PassTrix". If you want to have a different database name, you may specify here. PMP will take care of creating the Master Key, Symmetric Key etc.
- Authentication: The way in which you would like to connect to the SQL server. If you are connecting to the SQL server from Windows, you have the option to make use of the Windows Single Sign On facility provided PMP service is running with a service account, which has the privilege to connect to SQL server. In that case, choose the option "Windows". Otherwise, select the option "SQL". It is recommended to choose the option 'Windows' as the username and password used for authentication are not stored anywhere.
- User Name and Password: If you have selected the option "SQL", specify the user name and password with which PMP needs to connect to the database. The username and password entered here will be stored in database_params.conf file in PMP. So, you need to take care of hardening the host. Here, you have the option to use even your Windows login credentials, if you are connecting to the database from Windows. In this case, you need to enter the username as <domain-name>\<username>
- Encryption Key: The key with which your data is to be encrypted and stored in the SQL server. You may either leave it "Default" making PMP to generate a key. If you want to have your custom key, select the option "Custom".
If you have selected the option "Custom:" If you have chosen the option 'Custom', you need to create a new database, create Master Key, create Certificate (this will be certificate name) and Create the Symmetric Key using AES 256 encryption. You need to do the following steps:
Create Database -> For details, refer to https://msdn.microsoft.com/en-us/library/aa258257(v=sql.80).aspx
Create Master Key -> For details, refer to https://technet.microsoft.com/en-us/library/ms174382.aspx
Create Certificate -> For details, refer to https://msdn.microsoft.com/en-us/library/ms187798.aspx
Create Symmetric Key -> For details, refer to https://msdn.microsoft.com/en-us/library/ms188357.aspx
After doing the above, you need to provide certificate name and symmetric key name in the GUI
Step 3
- Finally, click "Test" to ensure that the connection settings are proper and then click "Migrate". The status of data migration will be displayed in the textbox
- After the end of data migration, start PMP server
Troubleshooting Tip
If database migration is attempted when PMP server is running, you will encounter this error in the DB Migration GUI: "Server seems to be running. Shutdown PMP server and try again" and the GUI will remain open. In case, you get this error even after shutting down the server, you need to delete the .lock file under <PMP-Installation-Folder>/bin folder and then try migration. If the issue persists, contact PMP support with the .lock file.
Important Note:
After completing the migration, start PMP server and navigate to "Admin >> Resource Additional Fields" and "Admin >> Accounts Additional Fields". Open the GUI and click "Save". This will take care of restoring the additional fields added you in the migrated instance too.
Migrating data from MySQL to PostgreSQL (applicable only for builds 6801 and later)
If you are already using PMP with MySQL and wish to use PostgreSQL as backend database, you may follow the steps below to migrate the data.
- Stop PMP server and make sure mysqld process is not running.
- Download PostgreSQL-9.2.1-Windows.zip (For Windows) / PostgreSQL-9.2.1-Linux.zip (For Linux) and extract the zip file under <Password Manager Pro Installation Folder>
- Open a command prompt and navigate to <Password Manager Pro Installation Folder>/bin directory
- Execute MigrateMySQLToPgSQL.bat (in Windows) or MigrateMySQLToPgSQL.sh (in Linux)
- Start PMP server. Now, PMP will run with PostgreSQL as backend database
Quick Start Guide
Refer to the "Work flow in PMP" section of help documentation.
For any assistance, please contact passwordmanagerpro-support@mnageengine.com / Toll Free: + 1 925 924 9500
Managing PMP Encryption Key (from PMP 6402 onwards)
PMP uses AES-256 encryption to secure the passwords and other sensitive information in the password database. The key used for encryption is auto-generated and is unique for every installation. By default, this encryption key is stored in a file named pmp_key.key under <PMP_HOME>/conf folder. For production instances, PMP does not allow the encryption key to be stored within its installation folder. This is done to ensure that the encryption key and the encrypted data, in both live and backed-up database, do not reside together.
We strongly recommend that you move and store this encryption key outside of the machine in which PMP is installed - in another machine or an external drive. You can supply the full path of the folder where you want to move the pmp_key.key file and manually move the file to that location and delete any reference within PMP server installation folder. The path can be a mapped network drive or external USB (hard drive / thumb drive) device.
PMP will store the location of the pmp_key.key in a configuration file named manage_key.conf present under <PMP_HOME>/conf folder. You can also edit that file directly to change the key file location. After configuring the folder location, move the pmp_key.key file to that location and ensure the file or the key value is not stored anywhere within the PMP installation folder.
PMP requires the pmp_key.key folder accessible with necessary permissions to read the pmp_key.key file when it starts up every time. After a successful start-up, it does not need access to the file anymore and so the device with the file can be taken offline.
Important Note: You need to take care of sufficiently protecting the key with layers of encryption (like using Windows File Encryption for example) and access control. Only the PMP application needs access to this key, so make sure no other software, script or person has access to this key under any circumstance. You also need to take care of securely backing up the pmp_key.key file yourself. You can recover from PMP backups only if you supply this key. If you misplace the key or lose it, PMP will not start.
Rotating Encryption Key
Though the encryption key is being securely managed outside of PMP, periodically changing the encryption key is one of the best practices. PMP provides an easy option to automatically rotate the encryption key.
How the key rotation process work?
PMP will look for the current encryption key present in pmp_key.key in the path specified in manage_key.conf present under <PMP_HOME>/conf folder. Only if it is present in the specified path, the rotation process will continue. Before rotating the encryption key, PMP will take a copy of the entire database. This is to avoid data loss, if anything goes wrong with the rotation process.
During the key rotation process, all passwords and sensitive data will be decrypted first using the current encryption key and subsequently encrypted with the new key. Later, the new key will be written in the pmp_key.key file present in the location as specified in the manage_key.conf file. If there occurs any error while writing the key, rotation process will not continue. At the end of successful rotation process, PMP will write the old encryption key in the same file that contains the new key.
To rotate the encryption key (if you are NOT using High Availability)
- The current encryption key (pmp_key.key file) should be present in the location as specified in the manage_key.conf file. Also, ensure that PMP gets read/write permission when accessing the pmp_key.key file.
- PMP server should be stopped
- Open a command prompt and navigate to <PMP-Installation-Folder>/bin directory and execute RotateKey.bat (in Windows) or sh RotateKey.sh (in Linux)
- Based on the number of passwords managed and other parameters, the rotation process will take a few minutes to complete
- Once you see the confirmation message about successful completion of the rotation process, you can start the PMP server.
To rotate the encryption key (if you are using High Availability setup)
- Go to Admin tab>>General>>High Availability in the web interface. Make sure high availability and replication status are alive.
- The current encryption key (pmp_key.key file) should be present in the location as specified in the manage_key.conf file. Also, ensure that PMP gets read/write permission when accessing the pmp_key.key file.
- PMP Primary server should be stopped and make sure PMP Secondary server is running.
- Open a command prompt in PMP Primary installation and navigate to
/bin directory and execute RotateKey.bat (in Windows) or sh RotateKey.sh (in Linux) - Based on the number of passwords managed and other parameters, the rotation process will take a few minutes to complete. You will see confirmation message upon successful completion of the rotation process
- ou need to copy the new encryption key from Primary installation and put it in the location from where the standby looks for pmp_key.key file as specified in the manage_key.conf file. (That means, you need to copy the pmp_key.key file in Primary and put it in the location as specified in the manage_key.conf file). Then you can start primary and standby servers.
Managing PMP Database Password
- Apart from the AES encryption, the PMP database is secured through a separate password, which is auto-generated and unique for every installation
- The password for the database can be stored securely in the PMP itself
- There is also option to store it at some other secure location accessible to the PMP server
Leaving it to PMP
- If you choose to leave it to PMP, you need not do anything. PMP will take care of it automatically
Storing it by yourself
- By default, the database password is present in the file <PMP Installation Folder>/conf/database_params.conf file
- If you choose to manage the database key by yourself, you need to store this configuration file somewhere securely and instruct the location of the file to PMP
If you are starting PMP as service, go to <<PMP Installation Folder>/conf/wrapper.conf (in Windows) / <PMP Installation Folder>/conf/wrapper_lin.conf (in Linux) and edit the following entry under "Java Additional Parameters"
wrapper.java.additional.9=-Ddatabaseparams.file=<full path of the database_params.conf file location>If you are starting PMP from command line or through Start >> Programs, you need to edit the file system_properties.conf present in <PMP Installation Folder>/conf directory. In this file, edit the following entry under "Splash Screen default Properties"
databaseparams.file=<full path of database_params.conf file>
Note: If you misplace the conf file or lose it, PMP will not start. So, take care to save it in a secure location.
Ports Used by PMP
PMP uses the following two ports:
Licensing
There are three license types:
- Evaluation download valid for 30 days capable of supporting a maximum of 2 administrators
- Free Edition licensed software allows you to have 1 administrator and manage up to 10 resources. Valid forever.
- Registered Version - need to buy license based on the number of administrators required and the type of edition Standard/Premium:
- Standard - If your requirement is to have a secure, password repository to store your passwords and selectively share them among enterprise users, Standard Edition would be ideal.
- Premium - Apart from storing and sharing your passwords, if you wish to have enterprise-class password management features such as remote password reset, password alerts and notifications, application-to-application password management, reports, high-availability and others, Premium edition would be the best choice.
Features Matrix
| Standard Edition | Premium Edition |
|---|---|
|
|
- For more information and to get license, contact sales@manageengine.com
Moving PMP Installation Within Same Machine / From One Machine to Another
If you want to move the PMP installed in one machine to another or to a different location within the same machine, follow the procedure detailed below:
Prerequisite
- Do not remove existing installation of PMP until the new installation works fine. This is to ensure backup, to overcome disasters/data corruption during the movement.
Procedure
If you are using the PostgreSQL database bundled with PMP
- Take backup of the current database Install the same version of PMP (as the one you are currently running) in the new machine
- Restore the backup data in the new installation
If you are using MySQL as backend database
- Stop PMP server / service, if running
- If you have installed PMP to run as a startup service, remove it as service before proceeding further.
- See the table below for the procedure to remove it as service.
- Take a zip of the entire PMP installation folder; move the zip to a different machine or to a different location in the same machine as required Then, install it to run as service.
| Installing as Startup Service in Windows | Installing as Startup Service in Linux |
|---|---|
To install as service using batch file
To remove as service using batch file
|
|
Note:
- In this option, you will not be able to uninstall the program through windows Add/Remove programs console. If you want to uninstall anytime, just delete the entire installation folder.
- You need not reapply the license after moving the installation
MSP Edition
If you want to use the MSP edition of PMP, refer to this section of the help documentation.