Important
- Please take a backup before upgrading to the latest build. How can i take a backup?
- The latest SupportCenter Plus version is 7.9 (build number 7942).
(How can I find my Build number?) - Instructions to apply the HotFix. In case of upgrade failure.
| Who should upgrade? | Download and Install |
|---|---|
| Customers using build 7939, 7940, 7941 | Upgrade Pack (README) to move to build 7942 (for both Windows, Linux) Important: Clear browser cache before accessing the web client. |
| Customers using build 7931, 7932, 7933, 7934,7935, 7936, 7938 | Upgrade Pack (README) to move to build 7939 (for both Windows, Linux) Important: Clear browser cache before accessing the web client. |
| Customers using build 7914, 7915, 7916, 7917, 7918, 7919, 7920, 7921, 7922, 7923, 7924, 7925, 7926, 7927, 7928,7929,7930 | Upgrade Pack (README) to move to build 7931 (for both Windows, Linux) Important: Clear browser cache before accessing the web client. |
| Customers using build 7703, 7704, 7800, 7801,7803,7804, 7900, 7901, 7902, 7903, 7904, 7905, 7906, 7907, 7908, 7909, 7910, 7912, 7913 | Upgrade Pack (README) to move to build 7914 (for both Windows, Linux) Important: Clear browser cache before accessing the web client. |
| Customers using build 7609 , 7700 , 7701 , 7702 | Upgrade Pack (README) to move to build 7703 (for both Windows, Linux) Important: Clear browser cache before accessing the web client. |
| Customers using build 7512 , 7601 , 7603 , 7604 , 7607 | Upgrade Pack (README) to move to build 7609 (for both Windows, Linux) Important: Clear browser cache before accessing the web client. |
| Customers using build 7016, 7503, 7504, 7505, 7506, 7507, 7508, 7509, 7510, 7511 | Upgrade Pack (README) to move to build 7512 (for both Windows, Linux) Important: Clear browser cache before accessing the web client. |
| Note: We strongly recommend you to take backups before migrating. This helps you prevent accidental loss of data. |
Instructions to apply the HotFix
- Shut down SupportCenter Plus Server.
- Run the script UpdateManager.bat (UpdateManager.sh for Linux) in the <SupportCenter_Plus_Home>/bin folder. This opens the Update Manager tool.
- Click "Browse" to select the HotFix file (ManageEngine_SupportCenter_Plus_<Version No>_0_0_SP-x_0.ppm file that you had downloaded) and then click "Install...".
- Follow the on-screen instructions to apply the Service Pack.
- Once the upgrade is complete, start SupportCenter Plus Server.
- Clear the browser cache before accessing the web client.
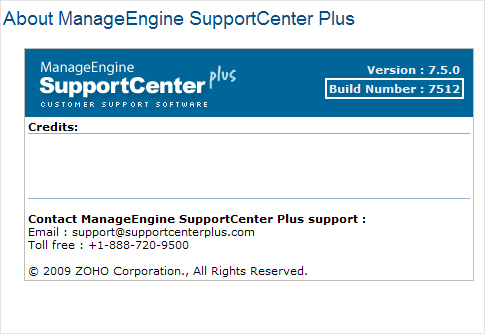
How can I find the Build Number of SupportCenter Plus?
- In the SupportCenter Plus web client, click the "Help >> About Product" link on top right of the page.
- You should see the Build number mentioned on the top right of the page.
- Check the following image guide to locate the build number.

Please read this before upgrading :
- Please ensure that a full backup has been taken before uprgrade. DON'T EVER UPGRADE WITHOUT A BACKUP.
- Please double check the server is stopped. Since there are possibilities that the operating system would automatically start the service.
- Ensure that you are applying the appropriate patch as per the table above.
- When you see an error during upgrade. Please follow the steps in the section "On upgrade failure" for an un-interrupted service. DON'T EVER TRY TO ROLL BACK BY CLICKING ON 'UNINSTALL' BUTTON THE UPDATE MANAGER WIZARD.
- When you come across an error during upgrade, DON'T EVER START THE APPLICATION. Please follow the steps in the section 'On upgrade failure'.
- When attempting to do multiple upgrades, START THE APPLICATION AFTER EACH UPGRADE. If it gets failed on one of the upgrade, please follow the steps in the section 'On upgrade failure'
On Upgrade failure :
If an upgrade fails, you will not be able to start the application. Don't panic! This is done to save you from unexpected problems due to corrupted data.
Here are the options to fix it,
Reach our support staffs at +1 408-352-9115. They shall assist you further to fix it. Also, we would need the files updatemanager0,1,2 available under/server/default/log, please compress it and send it toto investigate why the upgrade has failed.
In case, if you would like to restore into the original state, please follow the steps below
- Moving the backup to a safe location
- Copy the backup folder -- The backup taken prior to the upgrade will be available under the folder/backup. Please copy this folder to a different location on your PC to save the data.
- Re-install SupportCenter Plus
- Rename the existing installation folder and uninstall the application through Start >> Programs >> Manageengine SupportCenter Plus >> Uninstall.
- Download and install the build from which you were trying to upgrade from https://archives.manageengine.com/support-center (click on the folder has the build number and download the installation file .exe for Windows/.bin for Linux). If you do not remember the build number you were on, Here's a simple trick to find,
Go to the backup folder and find the recent backup taken, the file name will have the date on which it is taken and the build number.Example : 2009_1_8_10_5_36_backup_supportcenter_7012_fullbackup_01_08_2009_13_47.data
* in this 7012 is the build number
- After installing, start the server once.
- Restore the data backup in the new installation
- Stop the server and restore the data backup onto the new server(How to restore the data?).
- Start the server and check all the data & Configurations are available
Need help ?
Want help with upgrading SupportCenter Plus to the latest version? Contact SupportCenter Plus Support