Password Manager Pro MSP Edition Upgrade Packs Download
The latest PMP version is 7.5 (Build 7501). If you are using an earlier version, you need to apply upgradepack. How do I find my build number?
Download Upgrade Pack | Upgradepack Instructions
| From 7500 to 7501 | Upgrade pack 7500 to 7501 |
| From 7100/7101/7102/7103/7104/7105 to 7500 | Upgrade pack 7100/7101/7102/7103/7104/7105 to 7500 |
| From 7000/7001/7002/7003 to 7100 | Upgrade pack 7000/7001/7002/7003 to 7100 |
Instructions to apply the Upgrade Pack (Steps applicable only for PMP with MySQL OR PostgreSQL as back end database. For MS SQL server, refer to the next section below)
- In Windows, right-click the PMP tray icon and then click "Exit"
- Shutdown both Password Manager Pro primary and secondary services, if running. Check if mysql / postgres process is running. If so, terminate that process
- IMPORTANT:
Take a copy of the entire Password Manager Pro installation folder before applying the upgrade pack and keep it in some other location. If something goes wrong with the PMP upgrade, you can rely on the copy. All your settings will remain intact. - The upgrade Pack is to be applied through a tool named UpdateManager bundled with PasswordManager Pro. Navigate to <PMP_Installation_Folder>/bin directory and execute UpdateManager.bat (in Windows) or UpdateManager.sh (in Linux) to start the Update Manager.
- If you are applying multiple upgrade packs one-by-one, exit the Update Manager tool after applying one upgrade pack and make sure that the database process is not running. Then proceed with running the Update Manager tool to apply the next upgrade pack and so on
- Click Browse and select .ppm file that you downloaded. Click Install to install the upgrade pack. Wait until the upgrade pack is fully installed. [Normally, it takes a few minutes for PPM installation]
- Click Close and then click Exit to exit the Update Manager tool. If you are applying more than one upgradepack, apply them one-by-one and follow this step after applying each upgradepack
- After applying the upgrade pack, check if database process is running. If it is running, terminate that process
- Start the PasswordManager Pro server / service
- Once you upgrade to the latest version, the High Availability set up has to be reconfigured again. The old HA set up will not work. In addition, the existing secondary server has to be uninstalled and a new secondary server has to be installed. You may download a fresh, full build and install it as SECONDARY.
If you need any assistance or clarifications, please contact passwordmanagerpro-support@manageengine.com
Instructions to apply the Upgrade Pack (MS SQL server as backend database)
Prerequisite
- In Windows, right-click the PMP tray icon and then click "Exit"
- Shutdown both Password Manager Pro primary and secondary services, if running
- IMPORTANT:
Take a copy of the entire Password Manager Pro installation folder before applying the upgrade pack and keep it in some other location. If something goes wrong with the PMP upgrade, you can rely on the copy. All your settings will remain intact. Additionally, take a backup of the PMP database. - If you have configured High Availability, login to MS SQL Server management studio and delete the following files/folders as explained in the screenshots below: (If High Availability not configured, skip this step)
If you have configured High Availability, before applying the upgradepack, PMP requires that the 'subscriptions' and 'publications' related to PMP replication data be deleted AND 'publishing and distribution' be disabled. To do these, carry out the steps below:
- Deleting Subscription
First, navigate to Replication >> Local Publications >> <Name of PMP database:PMP-HA>. You will see a file with <PMP server name>. <Name of PMP database>. Right click the file and press 'Delete' in the menu.
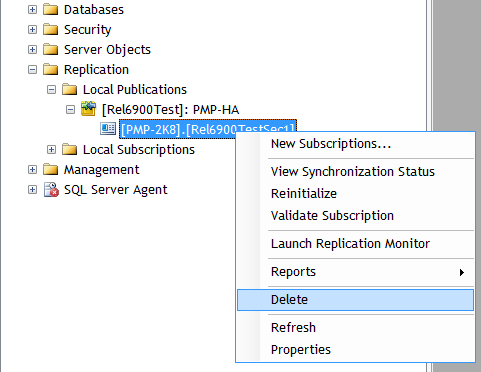
- Deleting Publication
Then, navigate to Replication >> Local Publications >> <Name of PMP database:PMP-HA>. Right click the folder <Name of PMP database:PMP-HA> and press 'Delete' in the menu.

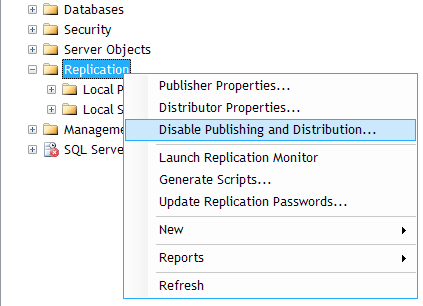
- Disabling Publishing & Distribution
Then, right click the 'Replication' folder and click the option "Disable Publishing and Distribution"
Applying Upgradepack
- The upgrade Pack is to be applied through a tool named UpdateManager bundled with PasswordManager Pro. Navigate to <PMP_Installation_Folder>/bin directory and execute UpdateManager.bat (in Windows) or shUpdateManager.sh (in Linux) to start the Update Manager.
- When configuring the MS SQL server as the backend database for PMP, if you have chosen the option to use 'Windows Authentication', you need to start the command prompt using the service account with which the PMP service has been configured to connect to the SQL server (that means, instead of running as administrator, you need to run as the service account). To check which service account has been configured, navigate to <PMP-Installation-Folder>/conf directory and open the file database_params.conf. Search for the word 'password' in this file. If you find this entry, it means that you are just running as 'administrator' and you have to start the command prompt as administrator. In case, you do find 'password' at all, search for 'username'. The value against this provides you the name of the service account.
- If you are applying multiple upgrade packs one-by-one, exit the Update Manager tool after applying one upgrade pack and make sure that the database process is not running. Then proceed with running the Update Manager tool to apply the next upgrade pack and so on
- Click Browse and select .ppm file that you downloaded. Click Install to install the upgrade pack. Wait until the upgrade pack is fully installed. [Normally, it takes a few minutes for PPM installation]
- Click Close and then click Exit to exit the Update Manager tool. If you are applying more than one upgradepack, apply them one-by-one and follow this step after applying each upgradepack
- After applying the upgrade pack, check if database process is running. If it is running, terminate that process
- Start the PasswordManager Pro server / service
- Once you upgrade to the latest version, the High Availability set up has to be reconfigured again. The old HA set up will not work. In addition, the existing secondary server has to be uninstalled and a new secondary server has to be installed. You may download a fresh, full build and install it as SECONDARY.
If you need any assistance or clarifications, please contact passwordmanagerpro-support@manageengine.com.
Instructions to upgrade JRE 7(Steps applicable when upgrading from builds 7000 and later)
Latest version of PMP runs with JRE v7u51. So, before proceeding with this upgrade, you need to download JRE and follow the instructions below. These steps are applicable only when upgrading from builds 7000 and later.
If you have installed PMP in Windows
- Ensure that PMP server is not running. In case, PMP is running as a service, shutdown that too. Also, check if mysql / postgres process is running. If so, terminate that process.
- Navigate to <PMP Installation directory>. You will see a folder named jre. Rename it as jre6
- Download the jre_windows_7u51.zip, copy the zip and paste it directly under <PMP Installation directory>
- Unzip the jre_windows_7u51.zip. This will create a folder named jre under <PMP installation directory>
- Now, navigate to the old jre6 (the one you renamed in step 2) available under <PMP-Installation-Directory>/jre6/lib/security/ folder. You will find a file named cacerts. Copy that file.
- Now, navigate to the new jre available under <PMP-Installation-Directory>/jre/lib/security/ and paste the cacerts you copied in the previous step.
- Now, run UpdateManager.bat and proceed with the upgrade
If you have installed PMP in Linux
- Ensure that PMP server is not running. Also, check if mysql / postgres process is running. If so, terminate that process.
- Navigate to <PMP Installation directory>. You will see a folder named jre. Rename it as jre6
- Download the jre_linux_7u51.zip, copy the zip and paste it directly under <PMP Installation directory>
- Unzip the jre_linux_7u51.zip. This will create a folder named jre under <PMP installation directory>
- Now, navigate to the old jre6 (the one you renamed in step 2) available under <PMP-Installation-Directory>/jre6/lib/security/ folder. You will find a file named cacerts. Copy that file.
- Now, navigate to the new jre available under <PMP-Installation-Directory>/jre/lib/security/ and paste the cacerts you copied in the previous step.
- Now, run UpdateManager.sh and proceed with the upgrade
How do I find out my Build number?
Log in to the PasswordManager Pro web interface, and click the About link in the top pane. You will find the build number mentioned below the version number. This is the build number of the currently installed PasswordManager Pro.