Steps to enable SSL
The following steps will guide you through enabling SSL in ADAudit Plus.
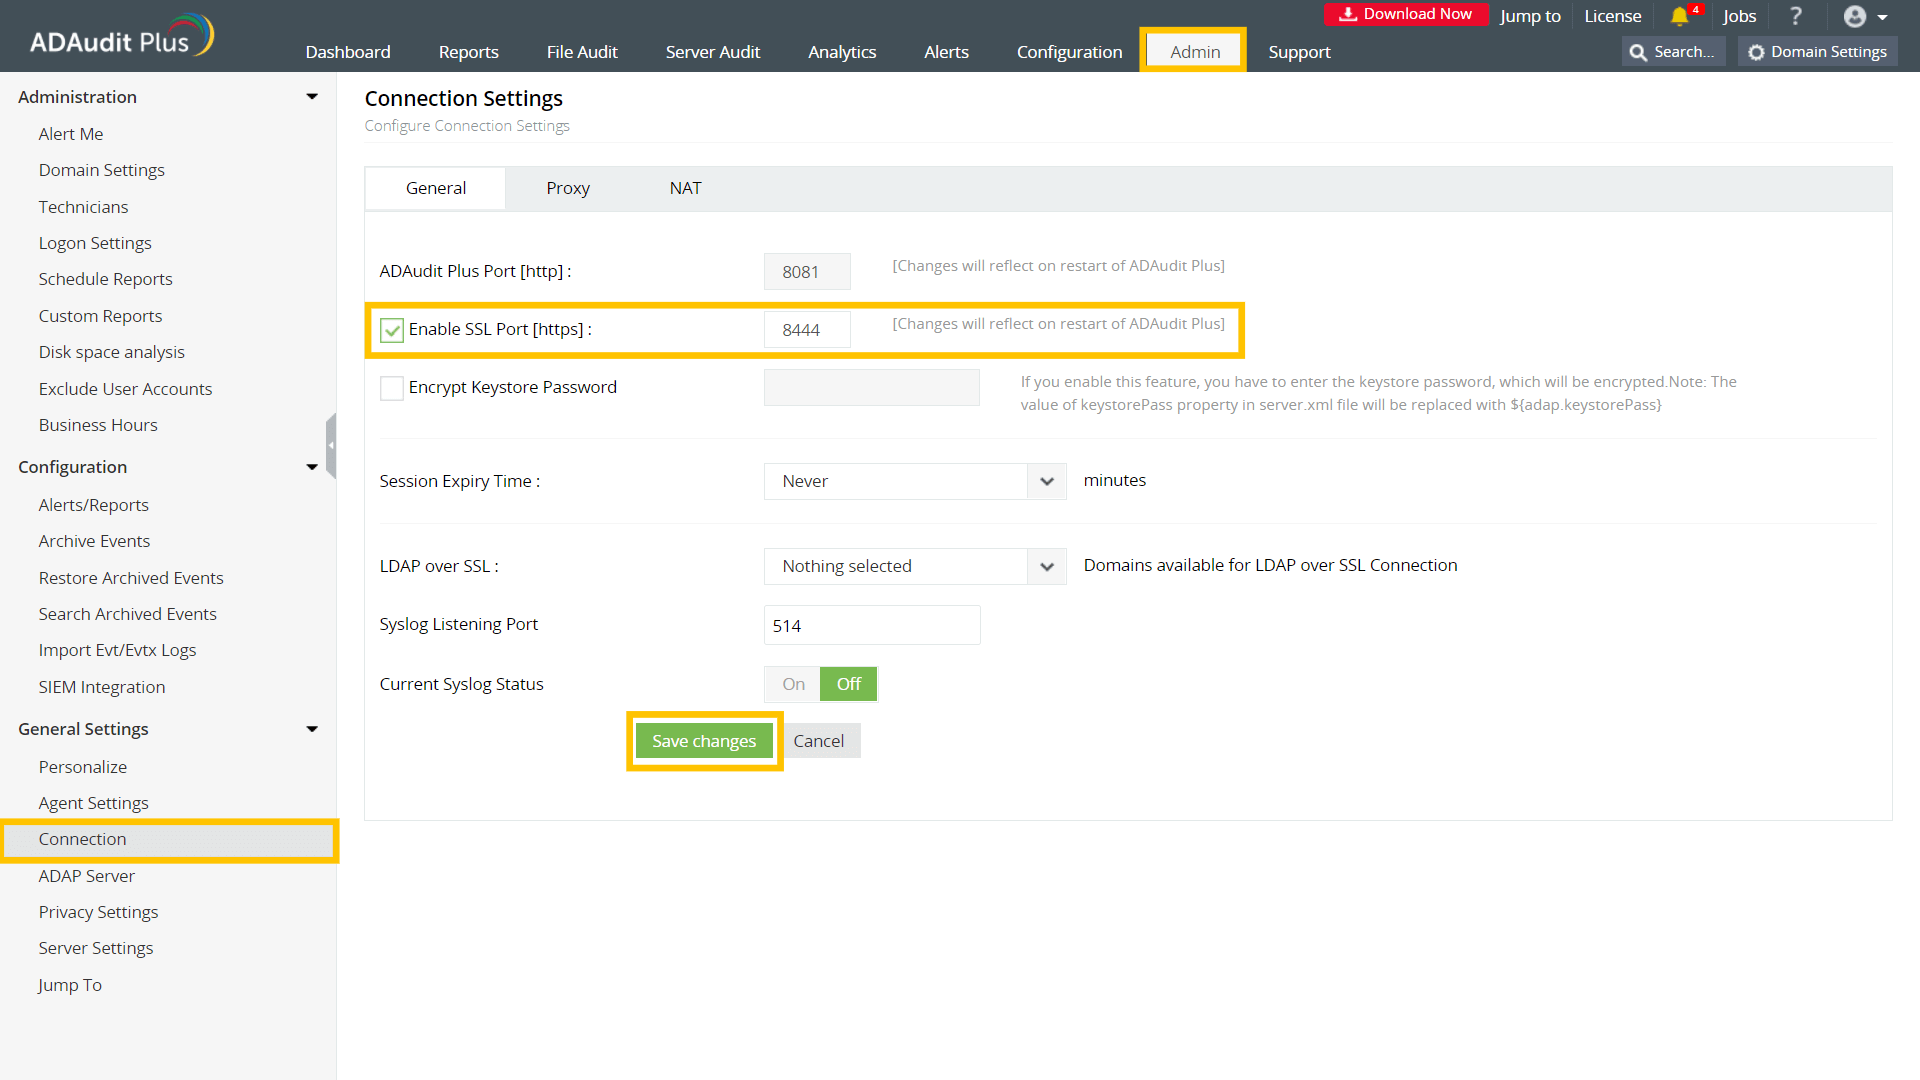
Step 1: Define the SSL port
- Log in to ADAudit Plus with an account that has administrative privileges.
- Navigate to Admin > General Settings > Connection.
- Check the Enable SSL Port [https] box. The default port number 8444 is selected automatically.
- Click Save changes.
- Restart ADAudit Plus for the changes to take effect.
Note: If you want to install an existing PFX or PKCS #12 certificate, skip to the PFX or PKCS #12 format section in Step 5.
Step 2: Create the keystore
A keystore is a password-protected file that contains all the keys the server will use for SSL transactions.
To create a certificate keystore file and generate encryption keys, run Command Prompt as an administrator, navigate to <product_installation_directory>\jre\bin, and execute the following command:
keytool -genkey -alias tomcat -keyalg RSA -validity 1000 -keystore <domainName>.keystore
Replace <domainName> with the name of your domain.
- Type in your keystore password.
Provide information based on the following guidelines:
What is your first and last name? Provide the machine name or the fully qualified domain name of the server hosting ADAudit Plus. What is the name of your organizational unit? Enter the department name that you want to appear in the certification. What is the name of your organization?/td> Provide the legal name of your organization. What is the name of your City or Locality? Enter the city name as provided in your organization’s registered address. What is the name of your State or Province? Enter the state or province as provided in your organization’s registered address. What is the two-letter country code for this unit? Provide the two-letter code of the country in which your organization is located. Enter key password for <tomcat> Enter the same password as the keystore password.
Note: If you choose to enter a different password, note it down because the key password will be required later.

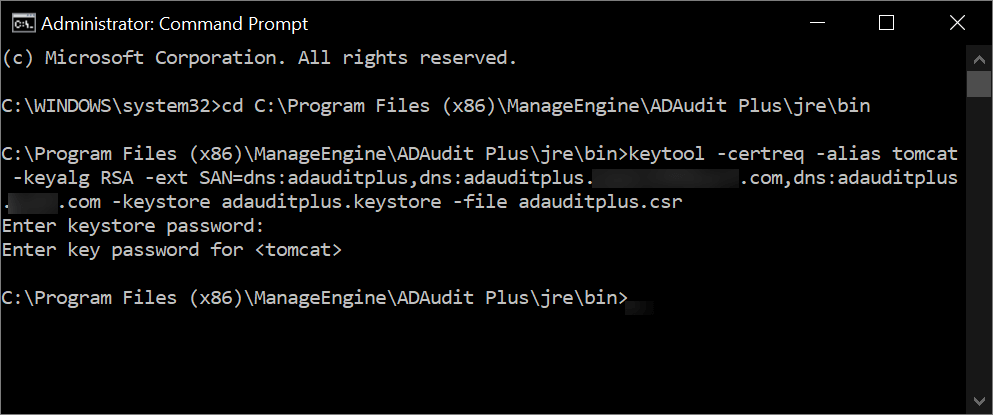
Step 3: Generate the certificate signing request (CSR)
To create a CSR with a subject alternative name (SAN), execute the following command in Command Prompt:
Replace <domainName> with the name of your domain and provide the appropriate SANs as shown in the image below:
Step 4: Issue the SSL certificate
In this step, you will connect to a certificate authority (CA), submit the CSR to the specific CA, and get the SSL certificate issued to you.
A. Issue the SSL certificate using an external CA
- To request a certificate from an external CA, submit the CSR to that CA. You can locate the CSR file in the <product_installation_directory>\jre\bin folder.
- Unzip the certificates returned by your CA and put them in the <product_installation_directory>\jre\bin folder.
Note: After the SSL certificate is issued by the external CA, proceed to Step 5 to install the certificate.
B. Issue the SSL certificate using an internal CA
An internal CA is a member server or domain controller in a specific domain that has been assigned the CA role.
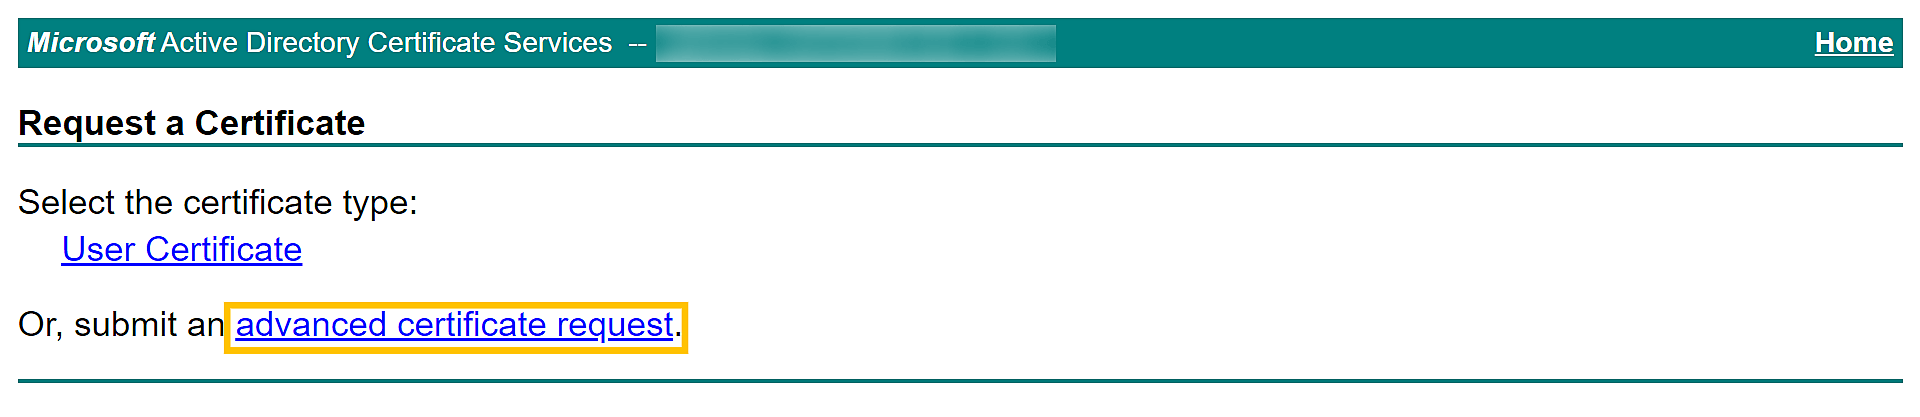
- Connect to the Microsoft Active Directory Certificate Services of your internal CA and click the Request a certificate link.

- On the Request a Certificate page, click the advanced certificate request link.
- On the Submit a Certificate Request or Renewal Request page, copy the content from your CSR file and paste it in the Saved Request field.
- Select Web Server or the appropriate template for Tomcat under Certificate Template and click Submit.

- The certificate will be issued when you click the Download certificate chain link. The downloaded certificate will be in the P7B file format.
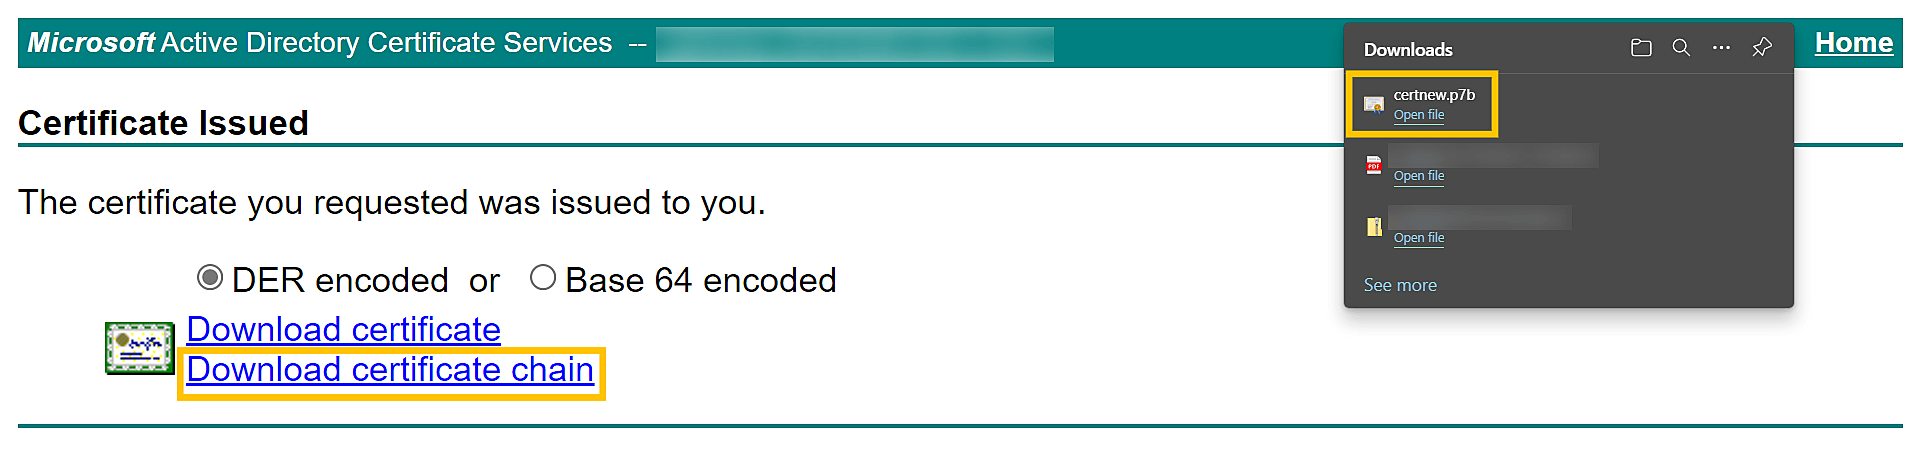
- Copy the P7B file to the <product_installation_directory>\jre\bin folder.
Step 5: Import the certificate
Follow the steps given below that correspond with the format in which you want to import the certificate.
A. Privacy-enhanced mail (PEM) format
To import the certificate into the keystore file in PEM format, open Command Prompt, navigate to <product_installation_directory>\jre\bin, and run the commands from the list below that applies to your CA.
General commands
- keytool -importcert -alias root -file <root.cert.pem> -keystore <your.domain.com>.keystore -trustcacerts
- keytool -importcert -alias intermediate -file <intermediate.cert.pem> -keystore <your.domain.com>.keystore -trustcacerts
- keytool -importcert -alias intermediat2 -file <intermediat2.cert.pem> -keystore <your.domain.com>.keystore -trustcacerts
- keytool -importcert -alias tomcat -file <server.cert.pem> -keystore <your.domain.com>.keystore -trustcacerts
Vendor-specific commands
For GoDaddy certificates
- keytool -import -alias root -keystore <domainName>.keystore -trustcacerts -file gd_bundle.crt
- keytool -import -alias cross -keystore <domainName>.keystore -trustcacerts -file gd_cross.crt
- keytool -import -alias intermed -keystore <domainName>.keystore -trustcacerts -file gd_intermed.crt
- keytool -import -alias tomcat -keystore <domainName>.keystore -trustcacerts -file <domainName>.crt
For Verisign certificates
- keytool -import -alias intermediateCA -keystore <domainName>.keystore -trustcacerts -file <your intermediate certificate.cer>
- keytool -import -alias tomcat -keystore <domainName>.keystore -trustcacerts -file <domainName>.cer
For Comodo certificates
- keytool -import -trustcacerts -alias root -file AddTrustExternalCARoot.crt -keystore <domainName>.keystore
- keytool -import -trustcacerts -alias addtrust -file UTNAddTrustServerCA.crt -keystore <domainName>.keystore
- keytool -import -trustcacerts -alias ComodoUTNServer -file ComodoUTNServerCA.crt -keystore <domainName>.keystore
- keytool -import -trustcacerts -alias essentialSSL -file essentialSSLCA.crt -keystore <domainName>.keystore
For Entrust certificates
- keytool -import -alias Entrust_L1C -keystore <keystore-name.keystore> -trustcacerts -file entrust_root.cer
- keytool -import -alias Entrust_2048_chain -keystore <keystore-name.keystore> - trustcacerts -file entrust_2048_ssl.cer
- keytool -import -alias -keystore <keystore-name.keystore> -trustcacerts -file <domainName.cer>/li>
For certificates purchased through the Thawte reseller channel
- keytool -import -trustcacerts -alias thawteca -file <SSL_PrimaryCA.cer> -keystore <keystore-name.keystore>
- keytool -import -trustcacerts -alias thawtecasec -file <SSL_SecondaryCA.cer> - keystore <keystore-name.keystore>
- keytool -import -trustcacerts -alias tomcat -file <certificate-name.cer> -keystore <keystore-name.keystore>
Note: If you are receiving the certificates from a CA that is not listed above, then contact your CA to get the commands required to add its certificates to the keystore.
B. P7B or PKCS #7 format
To import the certificate into the keystore file in P7B or PKCS #7 format, open Command Prompt, navigate to <product_installation_directory>\jre\bin, and execute the following command:
C. PFX or PKCS #12 format
- Copy and save your PFX or PKCS #12 file in the <product_installation_directory>\conf folder.
- Open the server.xml file present in the <product_installation_directory>\conf folder with a local text editor. Create a backup of the existing server.xml file just in case you wish to restore it.
- Navigate to the end of the server.xml file and look for connector tags that contain <Connector ... SSLEnabled="true"/>.
Edit the following values (which are case-sensitive) within the connector tags, without making changes to other values.
keystoreFile="./conf/<YOUR_CERT_FILE.pfx>"
keystorePass="<YOUR_PASSWORD>"
keystoreType="PKCS12"For example: <Connector name="SSL" port="8449" minSpareThreads="25" maxThreads="150" maxSpareThreads="75" enableLookups="false" disableUploadTimeout="true" debug="0" connectionTimeout="20000" acceptCount="100" URIEncoding="UTF-8" sslProtocol="TLS" sslEnabledProtocols="TLSv1,TLSv1.1,TLSv1.2" secure="true" scheme="https" keystorePass="<YOUR_PASSWORD>" keystoreFile="./conf/<YOUR_CERT_FILE.pfx>" keystoreType="PKCS12" clientAuth="false" ciphers="TLS_ECDHE_RSA_WITH_AES_128_CBC_SHA256,TLS_ECDHE_RSA_WITH_AES_128_CBC_SHA,TLS_ECDHE_RSA_WITH_AES_256_CBC_SHA384,TLS_ECDHE_RSA_WITH_AES_256_CBC_SHA,TLS_RSA_WITH_AES_128_CBC_SHA256,TLS_RSA_WITH_AES_128_CBC_SHA,TLS_RSA_WITH_AES_256_CBC_SHA256,TLS_RSA_WITH_AES_256_CBC_SHA" SSLEnabled="true"/>
- Restart ADAudit Plus.
Note: After installing the PFX or PKCS #12 certificate file and restarting ADAudit Plus, you can skip Step 6.
Step 6: Bind the certificates to ADAudit Plus
- Copy the <domainName>.keystore file from the <product_installation_directory>\jre\bin folder and paste it in the <product_installation_directory>\conf folder.
- Open the server.xml file present in the <product_installation_directory>\conf folder with a local text editor. Create a backup of the existing server.xml file just in case you wish to restore it.
- Navigate to the end of the server.xml file and look for connector tags that contain <Connector ... SSLEnabled="true"/>.
- Modify the following values (which are case-sensitive) within the connector tags.
- Replace the value of keystoreFile with "./conf/<domainName>.keystore".
Replace the value of keystorePass with the keystore password you used while generating the CSR for this certificate file.
Note: If you want to modify the TLS versions and ciphers attribute, refer to our security hardening guide.
- Save the server.xml file and close it.
- Restart ADAudit Plus again for the changes to take effect.
