High availability setup
Database and DataEngine configuration
PostgreSQL database
- Copy the contents under the pgsql folder (<Product_home\pgsql) in the primary server and paste them in the database server.
- In the database server, open Command Prompt as an administrator in the directory <pg_home>\bin, and run the following command to register the database service:
pg_ctl.exe register -N "ManageEngine ADAudit Plus - Database" -D ..\data -S demand
- Modify the postgresql.conf file under <pg_home>\data by adding the following entry:
listen_addresses = '*'
- Modify the pg_hba.conf file under <pg_home>\data by adding the following entries:
host all all 127.0.0.1/32 md5
host all all <DB Server ip addr >/32 md5
host all all <Primary Server ip addr>/32 md5
host all all <Standby Server IP addr>/32 md5
host all all <Public ip addr>/32 md5
- Start the ManageEngine ADAudit Plus - Database service on the database server.
- In both the primary and standby servers, modify the database_params.conf file under <Product_home>\conf by replacing localhost with the database server name/ip address in the following line:
url=jdbc:postgresql://localhost:33307/adap
Database - Microsoft SQL Server
- Copy the database_params.conf file under <Product_home>\conf on the primary server and paste it into <Product_home>\conf on the standby server.
DataEngine
- Download the DataEngine zip from DataEngine_1_0_0 and unzip the contents in the DataEngine Server.
- Open Command Prompt as an administrator in the directory <DataEngine home>\bin and run the batch file Unpack.bat.
- Run the following command to install the DataEngine service:
wrapper.exe -i ..\conf\wrapper.conf
- Copy the data and db folders under <Product_home>\apps\dataengine_xnode on the primary server and paste them in <DataEngine_home> on the DataEngine server.
- In both the primary and standby servers, modify the dataengine-xnodes.conf file found in conf\DataEngine\engines\xnode by adding the server name and replacing local with remote as shown below:
xnode.host = <DataEngine server name>
xnode.location = remote
- In the DataEngine server, modify the dataengine-xnode.conf file found in apps\dataengine-xnode\conf by adding the key below to enable remote request processing.
xnode.connector.accept_remote_request=true
- In the primary server, copy the xnode.connector.password value from the dataengine-xnodes.conf file found in conf\DataEngine\engines\xnode. Paste this value into the dataengine-xnode.conf file found in apps\dataengine-xnode\conf on the DataEngine server and into the dataengine-xnodes.conf file found in conf\DataEngine\engines\xnode on the standby server.
- In both the primary and standby servers, modify the datarepositories.conf file found in conf\DataEngine\xnode\datarepository by adding the server name as shown below:
xnodes = <DataEngine server name>
- Start the ManageEngine ADAudit Plus - DateEngine service.
Product configuration
- Start the database service on the database server in case of PostgreSQL.
- Start the ADAudit Plus service on the primary server.
Follow these steps to run the query:
- In the primary server, log in to the ADAudit Plus web console.
- Go to the Support tab and in the Support Info tile, click More.
- Under the ADAuditPlus DB Query section, run the following query:
select max(config_id) from adshaconfiguration
For PostgreSQL:
insert into adshaconfiguration values (<value from query1 + 1>, 3, '<primary server name>', '<standby server name>', 'Postgres', '<public ip>', '', '', null)
For Microsoft SQL:
insert into adshaconfiguration values (<value from query1 + 1>, 3, '<primary server name>', '<standby server name>', 'mssql', '<public ip>', '', '', null)
- In both the primary and standby servers, copy the ifcheck.exe, iflist.exe, ipadd.exe, and ipdel.exe files from <Product_home>\tools\fos\bin and paste them into <Product_home>\bin.
- In both the primary and standby servers, copy the fos.conf file from <Product_home>\tools\fos, paste it into <Product_home>\conf, and modify the IP properties and share name as follows:
#IP address properties
#Server specific - use ipconfig to find IP address
ipaddr=<ip4 address>
#Server specific - to find run iflist.exe and use the 'Adapter Name' from the result
publicIP.Ifname=<Adapter Name>
#Server specific - use ipconfig to find subnet mask
publicIP.netmask=<subnet mask>
#Common IP for HA. It should be static IP
publicIP.ipaddr=<common IP address>
#Name of the share
repl.remoteinstallationDir=
- In both the primary and standby servers, modify the wrapper.conf file under <Product_home>\conf by adding the following entries:
wrapper.event.wrapper_stop.command.argv.1=..\bin\ipdel.exe
wrapper.event.wrapper_stop.command.argv.2=<value of public IP to be unbound>
wrapper.event.wrapper_stop.command.block=TRUE
#wrapper.event.wrapper_stop.command.block.timeout=20
wrapper.event.wrapper_stop.command.on_exit.0=CONTINUE
wrapper.event.wrapper_stop.command.on_exit.default=CONTINUE
- In both the primary and standby servers, copy the module-startstop-processors.xml file from <Product_home>\tools\fos\conf and paste it into <Product_home>\conf\Persistence.
- In both the primary and standby servers, modify the customer-config.xml file under <Product_home>\conf by adding the following entries:
<configuration name="VersionHandler"
value="com.manageengine.ads.fw.ha.HAVersionHandler"/>
<configuration name="StartDBServer" value="false"/>
- In both the primary and standby servers, modify the product_detail.conf file under <Product_home>\conf\product_detail.conf by changing the below entry:
IS_HA_ENABLED=true
- Rename the product installation folder as MEADAP on both instances and assign full control permission for the machine accounts of both instances and database servers.
- Share the product installations of both instances, granting share permissions for all three machine accounts as shown in the image below:
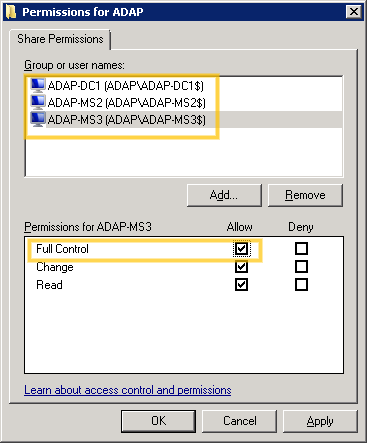
Note: Here, ADAP-DC1 is the database server, ADAP-MS2 is the primary server, and ADAP-MS3 is the standby server.
