SMS Verification
If you're enabling SMS Verification as a 2FA method, you can configure ADAudit Plus to use a GSM Modem for sending SMS notifications, or you can configure your own custom SMS gateway.
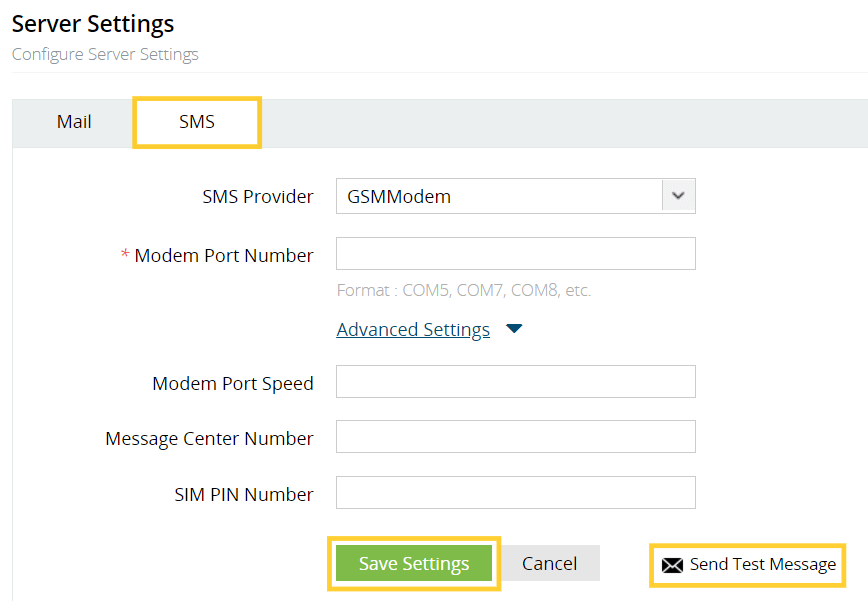
Steps to configure ADAudit Plus to use a GSM Modem as an SMS provider:
- Connect the GSM modem to the serial communication port with a serial cable.
- Open the ADAudit Plus web console.
- Navigate to Admin → General Settings → Server Settings.
- Under SMS, select GSMModem from the SMS Provider drop-down.
- Enter the port number the modem is connected to in Modem Port Number.
- Click Advanced Settings.
- Specify the Modem Port Speed, Message Center Number, and SIM PIN Number.
- Click Send Test Message, and enter the recipient's Mobile Number and the Message to be sent.
- Verify the SMS server settings by clicking Send SMS, and ensure that the test message is received by the recipient.
- Click Save Settings.
Note:
- If the message exceeds 160 characters, then the notification will be split into two or more text messages.
- To find the modem port number, go to My Computer → Manage → Device Manager → Modems → (select your modem) → Properties → Modem.
Steps to configure ADAudit Plus to use a custom SMS gateway:
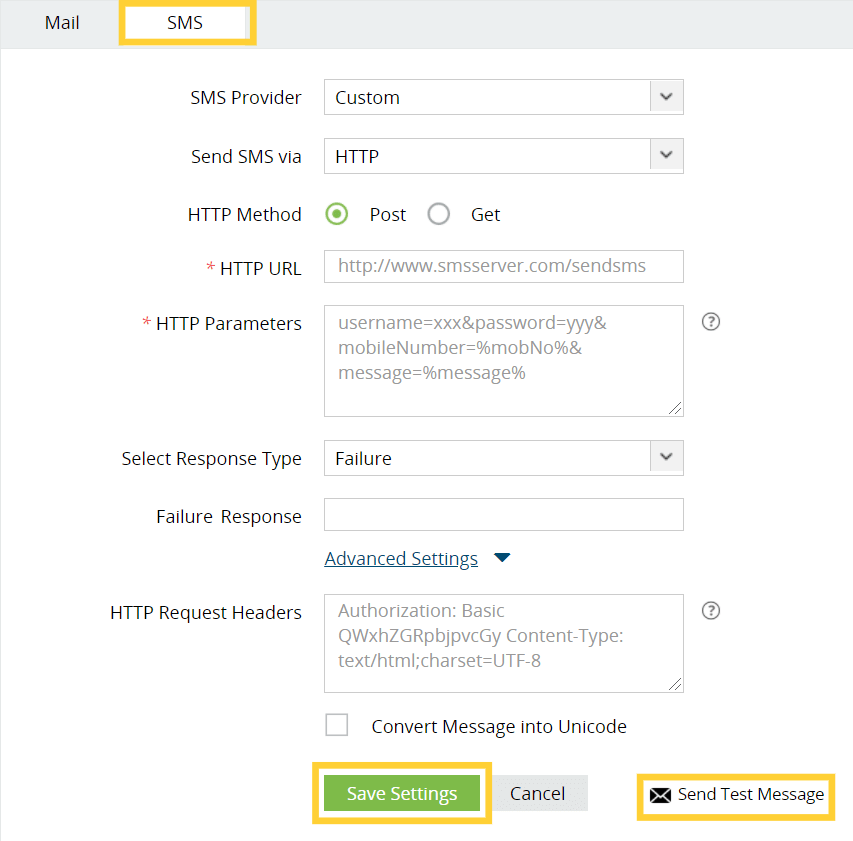
a. To use an HTTP-based custom SMS gateway:
Follow these steps to use an HTTP-based custom SMS gateway in ADAudit Plus:
- Open the ADAudit Plus web console.
- Navigate to Admin → General Settings → Server Settings.
- Under SMS, select Custom from the SMS Provider drop-down.
- Select HTTP from the Send SMS via drop-down.
- Select either of the available HTTP Methods, Post or Get.
- Enter the HTTP URL of your SMS gateway provider.
- Specify the HTTP Parameters specific to your SMS provider, the user's mobile number, and the message to be sent.
- Select the Success or Failure response from the Select Response Type drop-down.
- Specify the Success and Failure Response from the provider.
- Click Advanced Settings.
- Enter the HTTP Request Headers specific to your SMS provider.
- If the SMS provider expects unicoded messages, check Convert Message into Unicode.
- Click Send Test Message, and enter the recipient's Mobile Number and the Message to be sent.
- Verify the SMS server settings by clicking Send SMS, and ensure that the test message is received by the recipient.
- Click Save Settings.
Note:
- Separate the HTTP parameters with an ampersand (&) sign.
Example:
userName=xxx&password=yyy&mobileNumber=%mobNo%&message=%message%.- xxx: API authentication username.
- yyy: API authentication password.
- %mobNo%: This macro denotes the user's mobile number.
- %message%: This macro denotes the SMS message content.
- More HTTP parameters: If your SMS provider requires more parameters like unicode and apiID, include them as well using the "&" sign.
b. To use an SMTP-based custom SMS gateway:
Follow these steps to use an SMTP-based custom SMS gateway in ADAudit Plus:
- Open the ADAudit Plus web console.
- Navigate to Admin → General Settings → Server Settings.
- Under SMS, select Custom from the SMS Provider drop-down.
- Select SMTP from the Send SMS via drop-down.
- Enter the email address the SMS will be sent from in the From Address field.
- Specify the mobile number macro (%mobNo%), followed by the email address of the SMS provider in the To Address field. >br />Example: %mobNo%@adauditplus.com.
- Enter the required Subject using macros. Generally, it's either the mobile number (%mobNo%) or the message (%message%), depending on your SMS provider.
- Specify the Content to be sent using macros (%message%).
- Enter the name or the IP address of the SMTP Server, and the SMTP Server port.
- Provide the Username and Password with required permissions on the SMTP server.
- Select your connection security preference from the Connection Security drop-down.
- Click Save Settings.
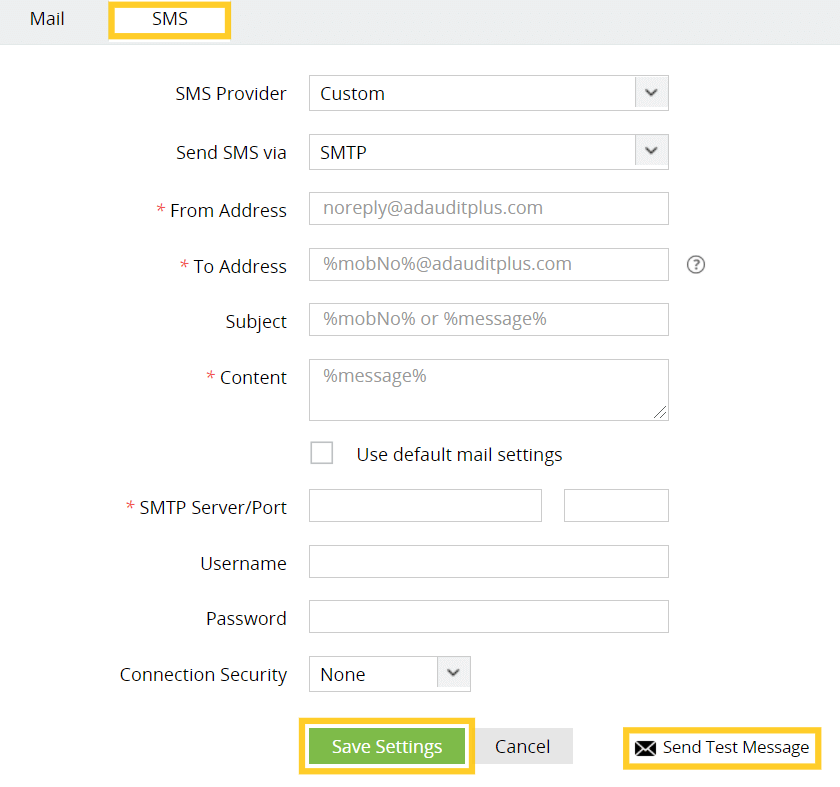
Note: If the SMTP server is not configured, check Use default mail settings for the mail server configured under the Mail tab to be used.
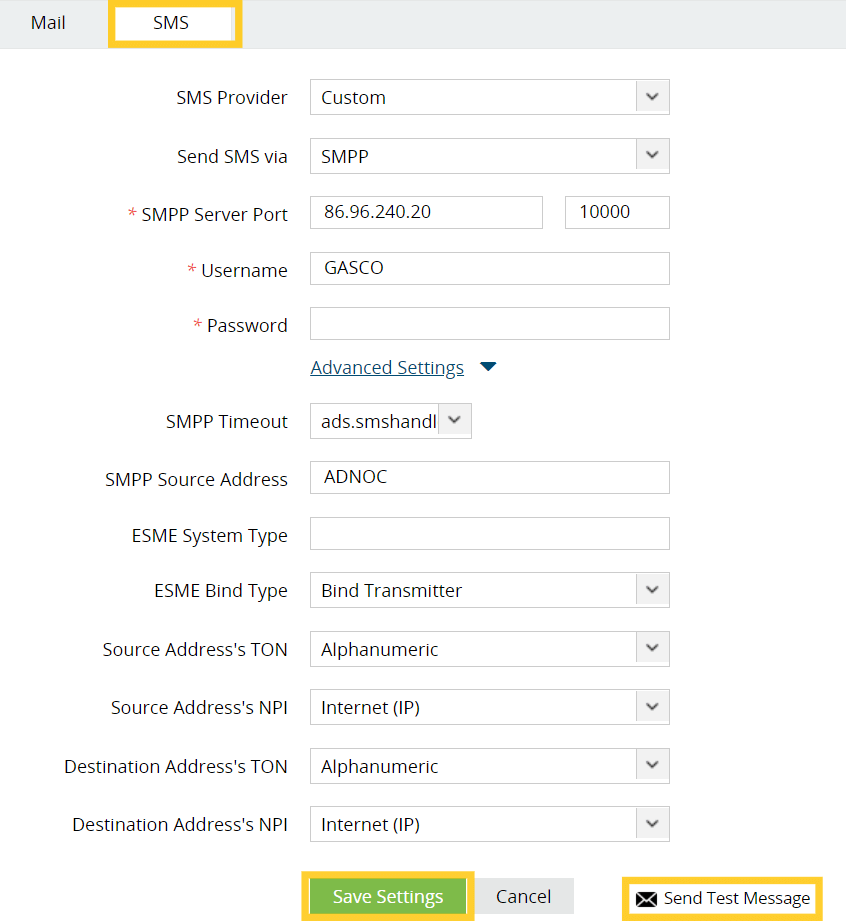
To use an SMPP-based custom SMS gateway:
Follow these steps to use an SMPP-based custom SMS gateway in ADAudit Plus:
- Open the ADAudit Plus web console.
- Navigate to Admin → General Settings → Server Settings.
- Under SMS, select Custom from the SMS Provider drop-down.
- Select SMPP from the Send SMS via drop-down.
- Enter the SMPP Server Port number.
- Specify the Username and Password with required permissions on the SMPP server.
- Click Advanced Settings.
- Specify the SMPP Time-Out and SMPP Source Address.
- Enter the ESME System Type and from the ESME Bind Type drop-down, and select Bind Transmitter or Bind Transceiver.
- Select the Source Address’ TON, Source Address’ NPI, Destination Address’ TON, and Destination Address’ NPI from their respective drop-downs.
- Click Save Settings.
Note:
- TON: Type of number
- NPI: Numeric plan indicato
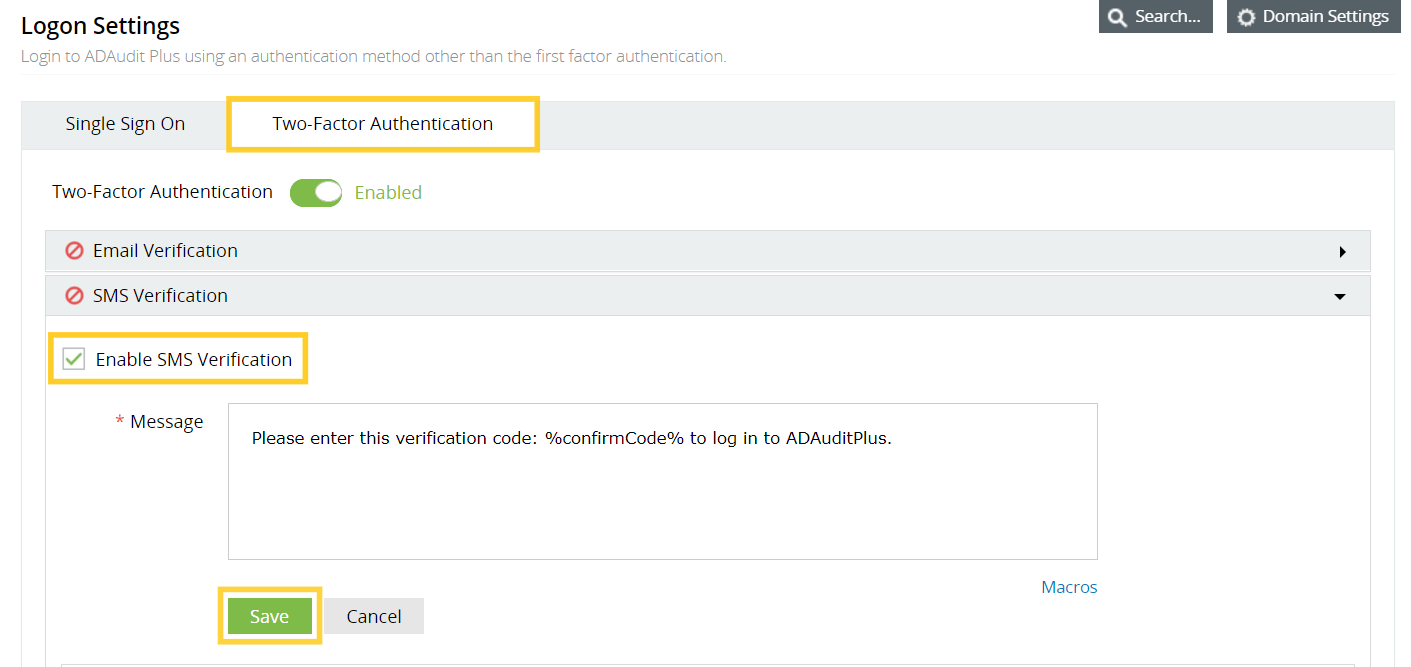
Steps to enable SMS Verification in ADAudit Plus
- Log in to your ADAudit Plus' web console.
- Navigate to Admin → Administration → Logon Settings, and select Two-Factor Authentication.
- Under SMS Verification, check Enable SMS Verification.
- Enter your content in the Message box using macros.
- Click Save.