


|
Migrating the PostgreSQL Data to MS SQL Server
In a simple three stage process, migrate the PostgreSQL data and run the ADAP Server with MS SQL Server.
- Stop the ADAP Server/Service.
- Invoke the <ADAP Home>\bin\migrateSQLData.bat in command prompt, to backup the data available in PostgreSQL database. By default backup file will be stored under <ADAP Home>\backup directory with the file name like 'backup_adauditplus_<Build_Number>_MM_DD_YYYY_hh_mm.data'.
|
You can also change the backup directory. Execute the batch file to backup by passing the absolute path of the directory as argument in the command prompt.
|
Common Settings to be performed in MS SQL Server
Open SQL Server Configuration Manager.
Goto ‘SQL Server Services’ and ensure the service 'SQL Server Browser' is running.
-
Goto SQL Server Network Configuration > Protocols for SQLEXPRESS (the given instance while configuring the MS SQL) > Enable TCP/IP. Then restart the SQL Server (SQLEXPRESS - the given instance) Service.
Set the following configuration for the SQL Server Configuration Manager:
-
SQL Server Network Configuration > Protocols for [instances] > Enable everything.
-
SQL Native Client Configuration > Client Protocols > Enable all.
Providing credentials to other users in the domain
- Go to SQL Server Management Studio.
- Expand the following <MACHINE_NAME>\SQLEXPRESS > Security > Logins.
- Check whether the user provided in the ADAP Service is already in the list;
If not, right click the Logins, New Login and provide a corresponding user name. The New user must have the sysadmin server level role and database level role of db_owner.
Follow the steps to provide the sysadmin role permission:
Right click the user, click 'Properties'
Go to 'Server Roles' > Check sysadmin and click 'OK'
|
|
Note: Details about user roles: Refer the documents in the following links: Server Level Roles | Database Level Roles | Additional Resources Server Role of the user should be 'sysadmin' and Database Role of the user should be 'db_owner'. The members of sysadmin server role can perform any activity in SQL Server and have completes control over all database functions. The members of db_owner database role can perform any activity in the database. |
MS SQL Server in local computer
Copy the following files to <ADAP Home>\bin folder.
- bcp.exe- <MSSQL Installation Dir>\Tools\Binn\bcp.exe
- bcp.rll- <MSSQL Installation Dir>\Tools\Binn\Resources\1033\bcp.rll
MS SQL Server in remote computer
Note: Please install the corresponding SQL Native Client / Command line Utilities in the ADAP machine as per the MS SQL Server version and CPU type of ADAP machine.
|
After installing the Command Line utilities, please copy the following files:
Copy the files to <ADAP Home>\bin folder.
- bcp.exe- <MSSQL Installation Dir>\Tools\Binn\bcp.exe
- bcp.rll- <MSSQL Installation Dir>\Tools\Binn\Resources\1033\bcp.rll
Windows Firewall Settings
If the Firewall is enabled in MS SQL Server machine, the TCP and UDP Ports need to be opened.
UDP Port is normally 1434.
To check the TCP Port settings open SQL Configuration Manager:
-
SQL Server Network Configuration > Protocols for <instances>
- Right click TCP/IP > Properties > Goto IP Addresses Tab and scroll until TCP Dynamic Ports and enter the current value in your Firewall.

Invoke the <ADAP Home>\bin\ChangeDB.bat in command prompt, to configure the MS SQL SERVER credentials like ServerName, Port, UserName and Password.
- Database Setup Wizard pops-up.
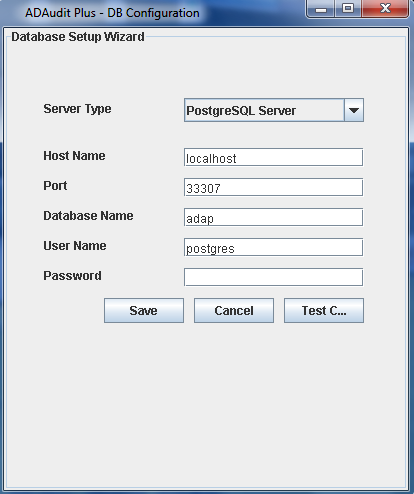
- In the wizard screen, select Server Type as MSSQL Server. Available SQL Server Instances are listed in a combo box. Enter the Host Name and Named instance of the SQL Server from the instances.
- Select the authentication type using the "Connect Using:" options.
- The options are:
- Windows Authentication
For Windows Authentication, the credentials of the Domain user are automatically taken.

- SQL Server Authentication
For MS SQL Server Authentication, enter the User Name and Password.

- Click Test Connection to check whether the credentials are correct. If the test fails, the credentials may be wrong, recheck and enter the correct credentials.
- Click Save button to save the MS SQL Server configuration. Note that, it will take few minutes to configure the settings of the SQL Server database.
- Invoke the <ADAP Home>\bin\run.bat to start the ADAP server in the command prompt.
- After the server is started completely, stop the server by terminating the run.bat in the command prompt or invoke the <ADAP Home>\bin\shutdown.bat
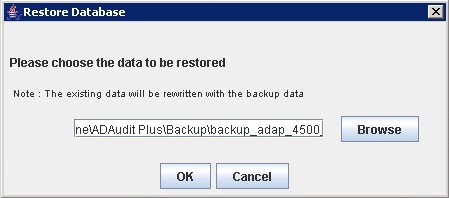
- Invoke the <ADAP Home>\bin\restoreMigratedSQLData.bat, browse and select the created backup file. Now click on 'OK' and wait till the database is completely restored.
|
Executing the restoreMigratedSQLData.bat will delete the existing data, if any. |
- Start the ADAP Server/Service to work with the MS SQL SERVER as the database.
|
|