Installation Guide
This installation guide will help you complete the installation of ManageEngine Analytics Plus.
Analytics Plus Editions
Analytics Plus is available in three editions, Personal, Standard, and Professional.
Personal edition: This is a single user version. This edition does not offer collaboration capabilities. The personal edition only supports data import from files/feeds, local and cloud databases. Users can analyze a total data volume of 10K rows from the supported data sources.
Standard edition: This is a multi-user version that offers complete collaboration capabilities. It supports all available data sources, but users are limited to using only one of them.
Professional edition: This is a multi-user version with no limitation on the volume of data that can be imported. It supports all available data sources and users can choose from any of them. The professional edition allows users to blend data from two or more data sources.
| Features | Personal Edition | Standard Edition | Professional Edition |
| Users | 1 | As per the purchased license | As per the purchased license |
Concurrent Guests | No | As per the purchased license | As per the purchased license |
| Records / Rows | 10,000 | Unlimited | Unlimited |
| Reports / Dashboards | Unlimited | Unlimited | Unlimited |
| Workspaces | 5 | Unlimited | Unlimited |
| Query Tables | Unlimited | Unlimited | Unlimited |
| Rebranding | No | Yes | Yes |
| Sharing and collaboration | No | Yes | Yes |
| Scheduled Emails | No | Yes | Yes |
| Multi language support | No | Yes | Yes |
| Import from Cloud drives, Files and Feeds and Local and cloud databases | Yes | Supports all available data sources but users are limited to using only one of them | Yes |
| Integration with other applications (Click here for a detailed list) | No | Supports all available data sources but users are limited to using only one of them | Yes |
To learn more about managing your Analytics Plus license, or applying a new one, refer the License Management documentation.
Prerequisites
- Exclude anti-virus scan for the folder where ManageEngine Analytics Plus is installed (eg. C:/ManageEngine/AnalyticsPlus)
- The hostname of the server where ManageEngine Analytics Plus is to be installed should not contain the underscore ( _ ) symbol in it. The underscore may affect the application startup and make certain services inaccessible on TCP/IP networks. For example, use the server hostname: https://manageengine-analyticsplus:8443 instead of https://manageengine_analyticsplus:8443
- The default port used by the application is 8443. 8443 (configurable at the time of installation) is the web server port, on which the web client will be accessible. This port should be open on your firewall in order to access the application from other workstations on your network.
- Analytics Plus can be installed on virtual servers. In such cases, Dynamic Resource Balancing should be turned off by configuring Distributed Resource Scheduler (DRS) at the ESX/VMlevel.
- Please make sure that the installation directory name or its parent directory names do not have any space character.
Prerequisites for Windows:
- If you wish to run the ManageEngine Analytics Plus batch files on Windows Server 2008, make sure that you have 'Edit' permission for ManageEngine Analytics Plus folders (even if you are an administrator).
- To run the installation, right click the installation file and choose the option "Run as administrator".
- Please do not install the application logged in as a root user. Installation should be done as a regular user.
- Ensure that the application is not installed in the root directory.
- Make sure you add the installation path to your antivirus exclusion list before you proceed.
System Requirements
The minimum system requirements for effectively running ManageEngine Analytics Plus are given below.
Professional Edition
| Specification | Evaluation | Production |
|---|---|---|
| OS | Windows 10 Ubuntu 18.04 LTS and above | Any 64 bit Windows 2016 Server R2 and above Ubuntu 18.04 LTS and above |
| Processor | 1 GHz | 2 GHz, Quad core processor |
| Memory | 8GB | 16GB |
| Free Disk Space | 25GB | 50GB |
| Supported browsers | Firefox v40 and above | Firefox v40 and above Google Chrome v40 and above |
*For higher volumes of data, please contact analyticsplus-support@manageengine.com to know about the exact system requirements.
Personal Edition
| Specification | Minimum requirement |
|---|---|
| OS | Windows 10 Ubuntu 18.04 LTS and above |
| Processor | 1 GHz |
| Memory | 4GB |
| Free Disk Space | 15GB |
| Supported browsers | Firefox v40 and above Google Chrome v40 and above |
Installation procedure
Windows Installation
To install ManageEngine Analytics Plus on a windows machine,
Download Analytics Plus from here.
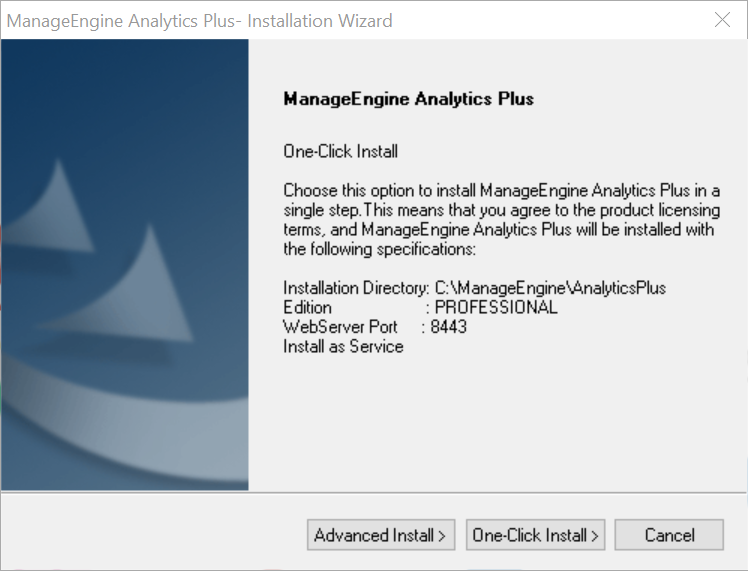
Double click the downloaded file to begin the installation process.
Select the One-Click Install option for quick installation. Choosing this option will auto select the installation directory and the application port numbers. Select the Advanced Install option if you wish to customize these configurations yourself.
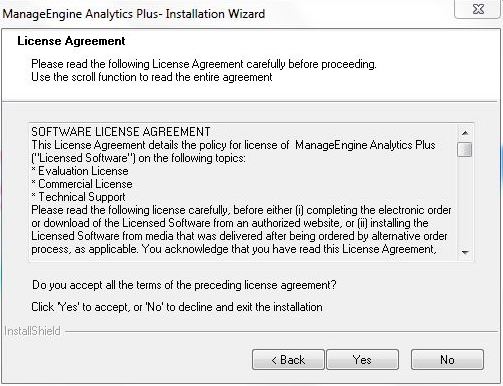
The following steps describe the screens in the Advanced Install option.
- Please read the license agreement carefully and accept the license agreement to proceed with the installation.
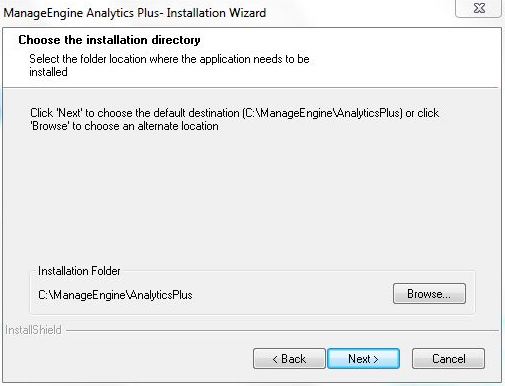
The next step in the installation process is choosing the installation directory where ManageEngine Analytics Plus is to be installed. By default, the application is installed in C:\ManageEngine\AnalyticsPlus directory.
Click Browse... button to change the installation directory. Choose the installation folder and click OK.
Click Next to continue with the installation process
Enter the Web Server Port number. The default port number provided is 8443. Choose an alternate port number if 8443 is being used by a different application.
Click Next to continue with the installation process.

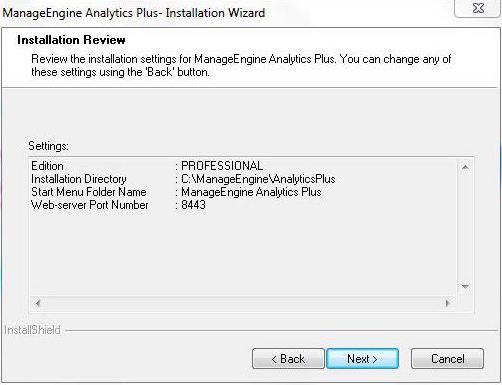
Verify your inputs on the confirmation page and click Next to proceed with the installation.
- The installation process takes a few minutes to complete. On successful installation, the Installation Completed screen is displayed. The option Start ManageEngine Analytics Plus is enabled by default. Click Finish to exit the installation wizard.
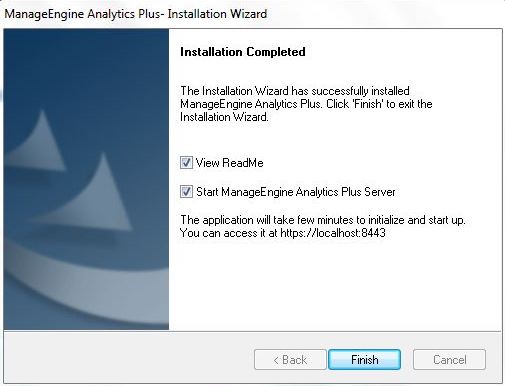
- The application launches in a browser automatically. The default username is admin and the default password is admin.
Linux installation
Graphical mode
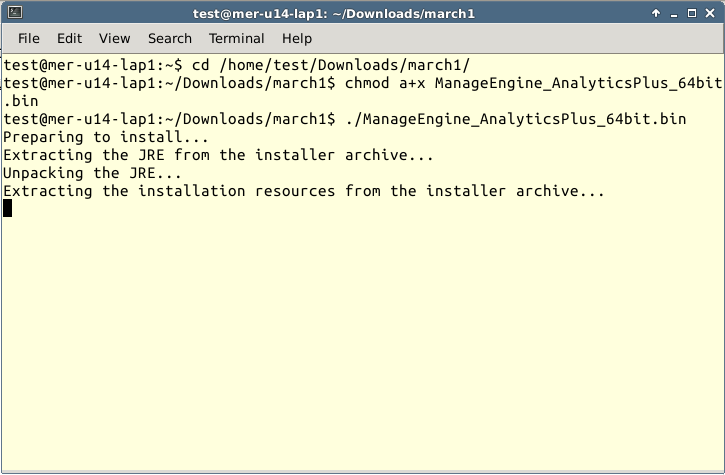
To install ManageEngine Analytics Plus on a Linux machine,
- Download Analytics Plus from here.
- Change the access permissions of the installation file using the following command chmod a+x ManageEngine_Analytics_Plus_x_Linux.bin

- Execute the installation file ./ManageEngine_AnalyticsPlus_64bit.bin
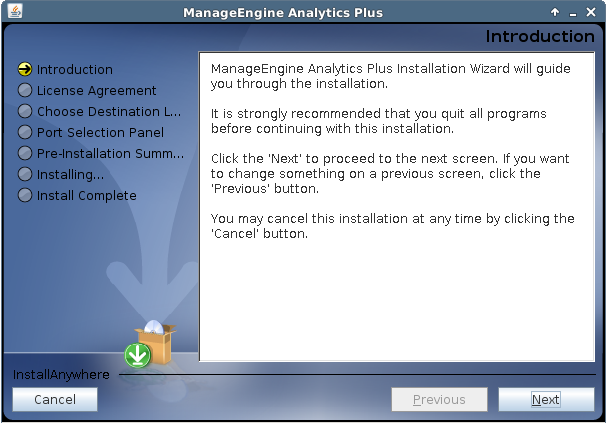
- Click Next in the installation wizard to start the installation.
- Please read and accept the license agreement to proceed with the installation.

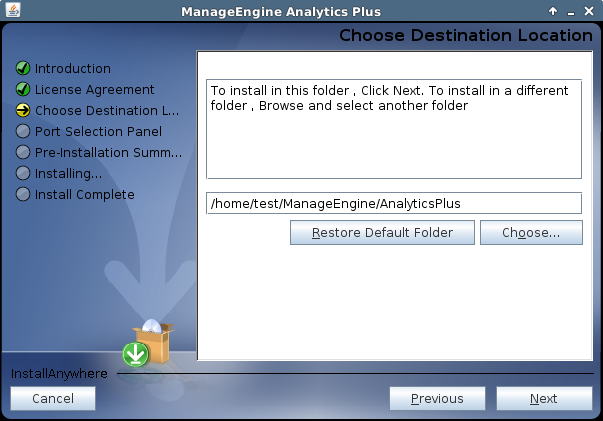
- The next step in the Installation process is choosing the installation directory. By default, the application is installed in home/<user>/ManageEngine/Analytics Plus directory. Use the Choose... button to pick a different installation directory. Once the desired path is selected, click OK and then click on Next.
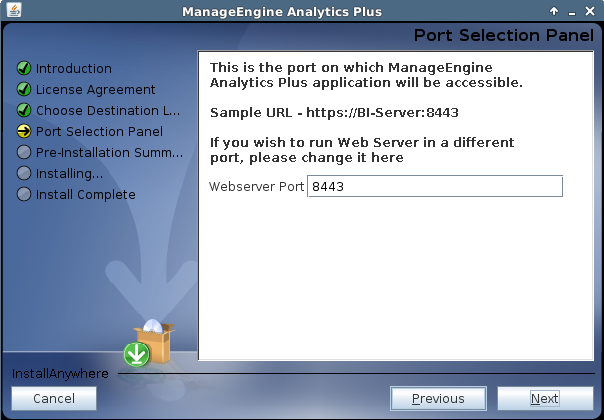
- Enter the Web Server Port Number to run the web server. The default port number is 8443. Choose an alternate port number if 8443 is being used by a different application. Click on Next to continue with the installation process.
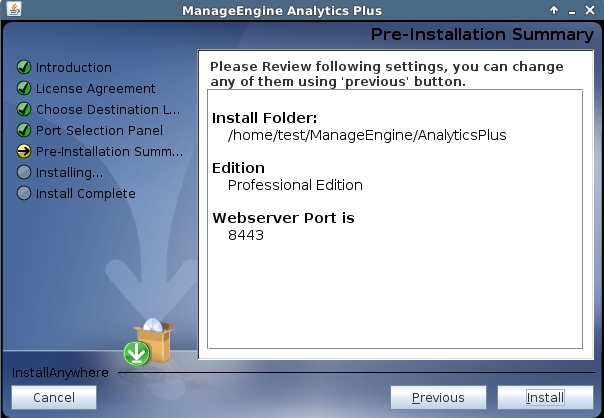
- Verify your inputs on the confirmation page and click Install to proceed with the installation.
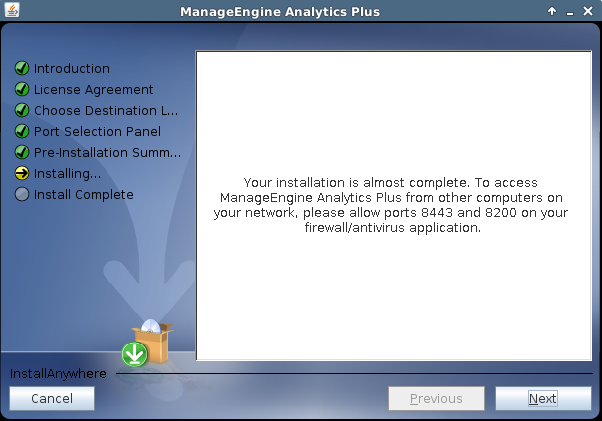
- The installation process takes a few minutes to complete. On successful installation, the Installation Complete screen is displayed. Click Next to continue.
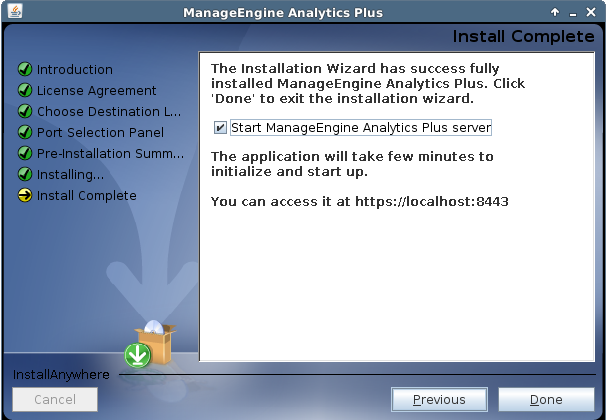
- The option to Start ManageEngine Analytics Plus is enabled by default. Click Done to exit the installation wizard.
Linux installation
Console mode
To install ManageEngine Analytics Plus on a Linux machine,
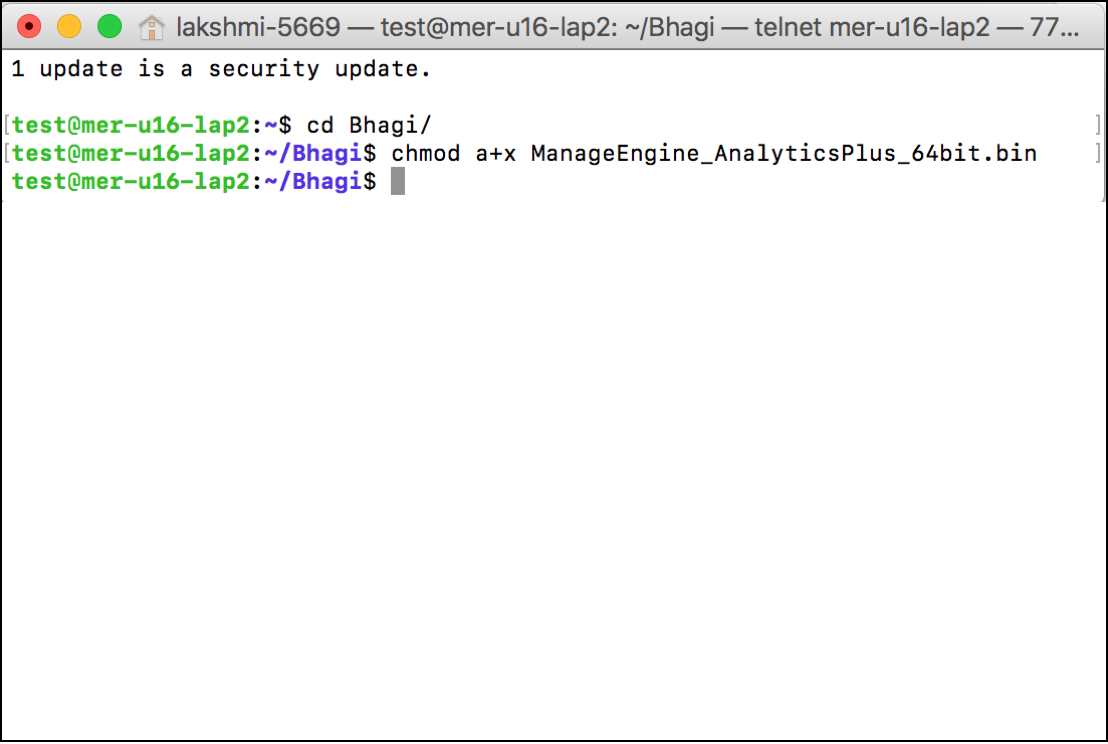
- Download Analytics Plus from here.
- Change the access permissions of the installation file using the following command chmod a+x ManageEngine_Analytics_Plus_64bit.bin
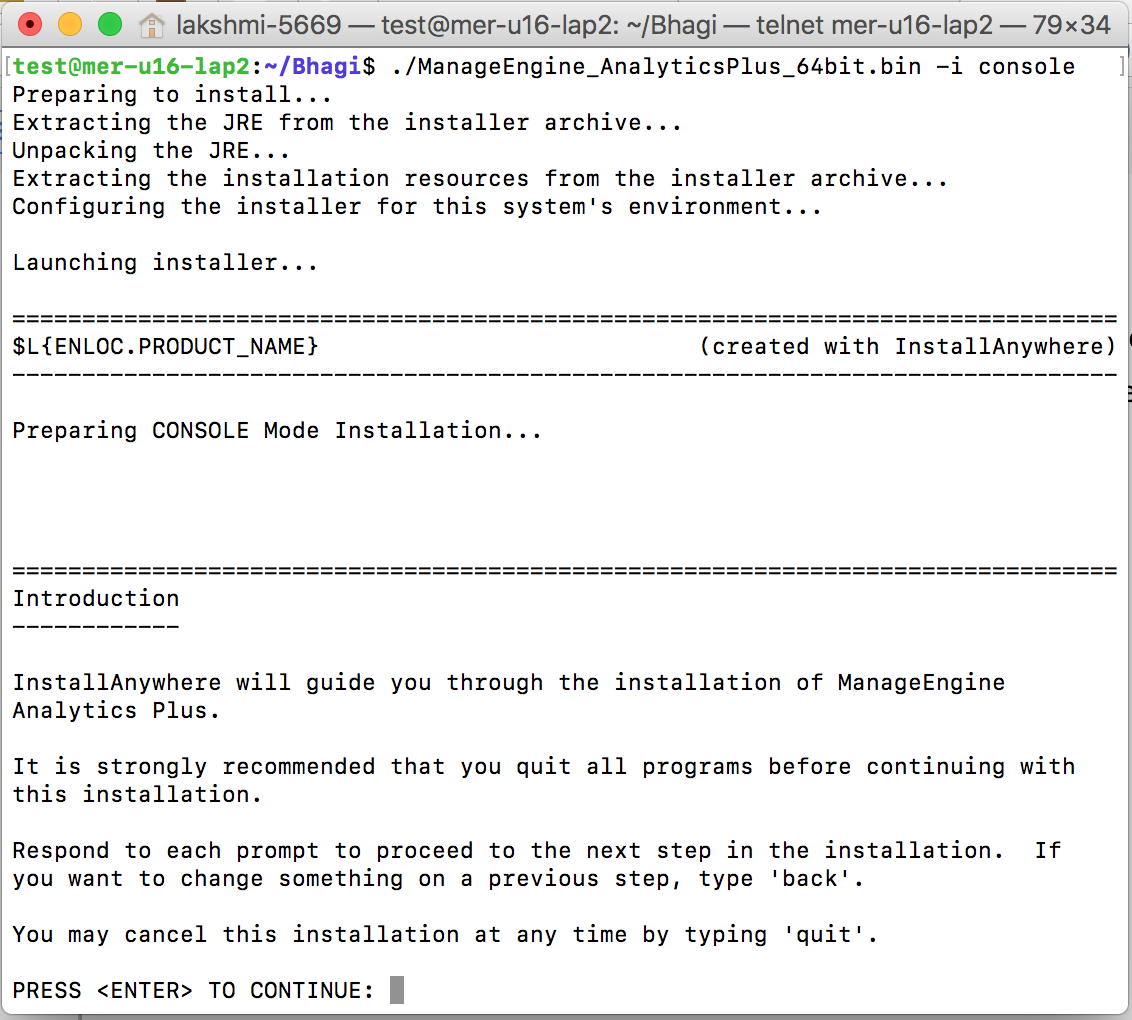
- Execute the installation file ./ManageEngine_AnalyticsPlus_64bit.bin -i console in the command prompt.
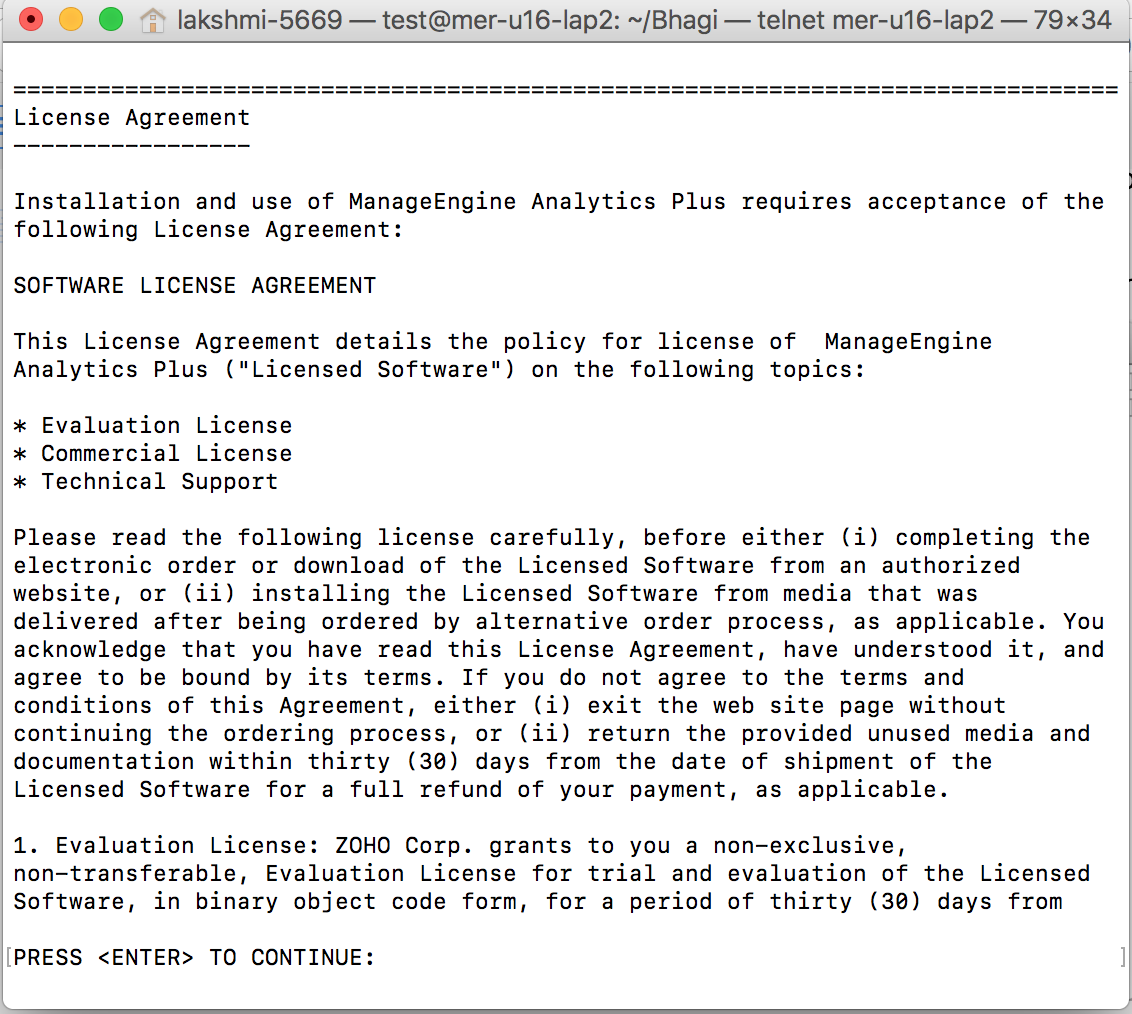
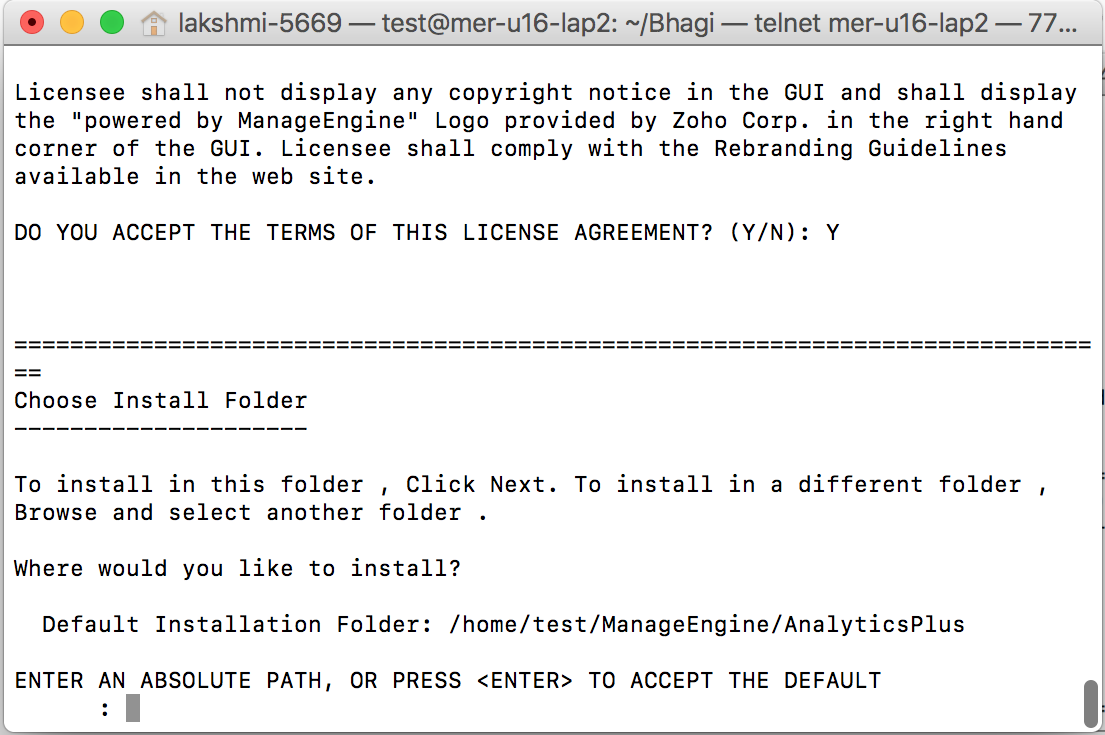
- Carefully read and accept the license agreement.
- The next step in the Installation process is choosing the installation directory. By default, the application is installed in home/<user>/ManageEngine/AnalyticsPlus directory. If you wish to pick a different installation directory, enter the absolute directory path and press Enter.
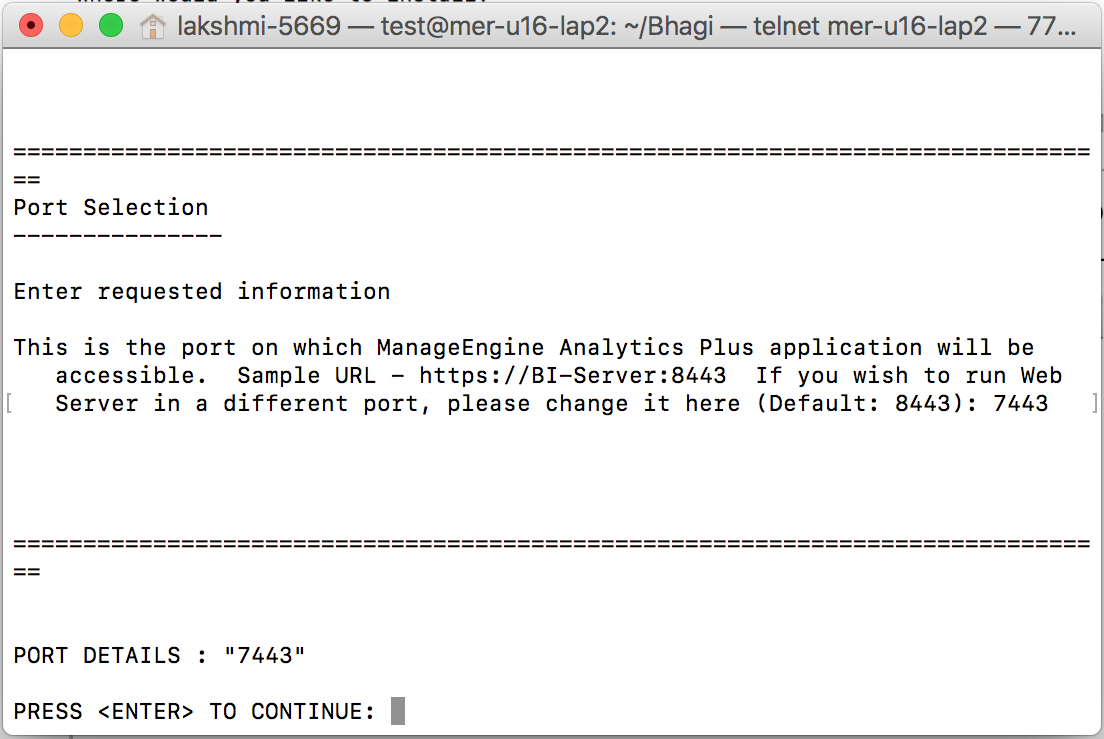
- Enter the Web Server Port Number. This will be the port on which the application will be accessible. The default port number is 8443. Choose an alternate port number if 8443 is being used by a different application. Press Enter to continue with the installation process.
- Verify your inputs on the Pre-installation summary page and press Enter to proceed with the installation.
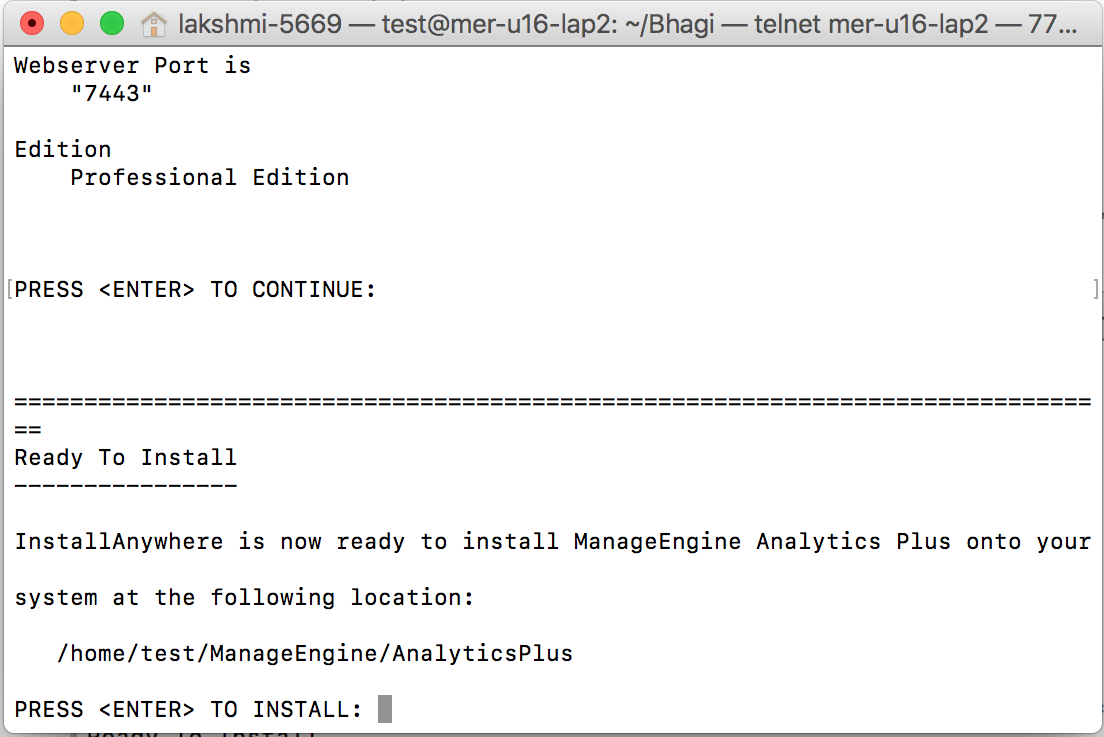
- Press Enter in the Ready to Install page to proceed with the installation.
- The installation process takes a few minutes to complete. On successful installation, the Installation Complete screen is displayed. Press Enter to continue.
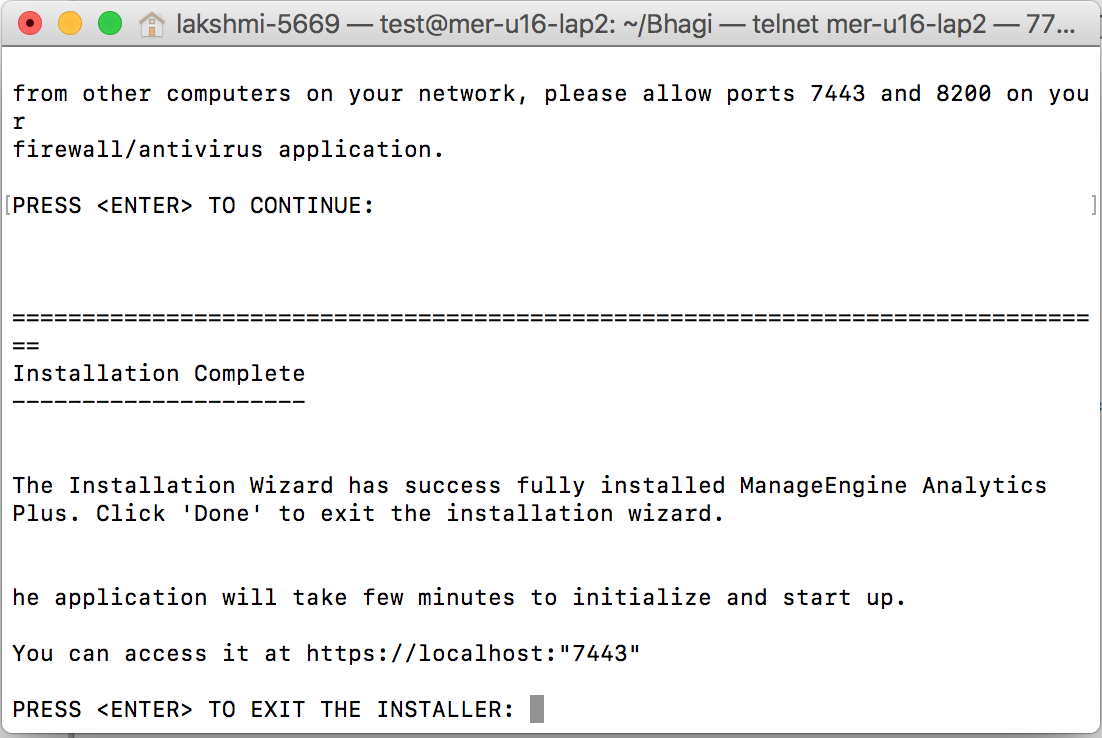
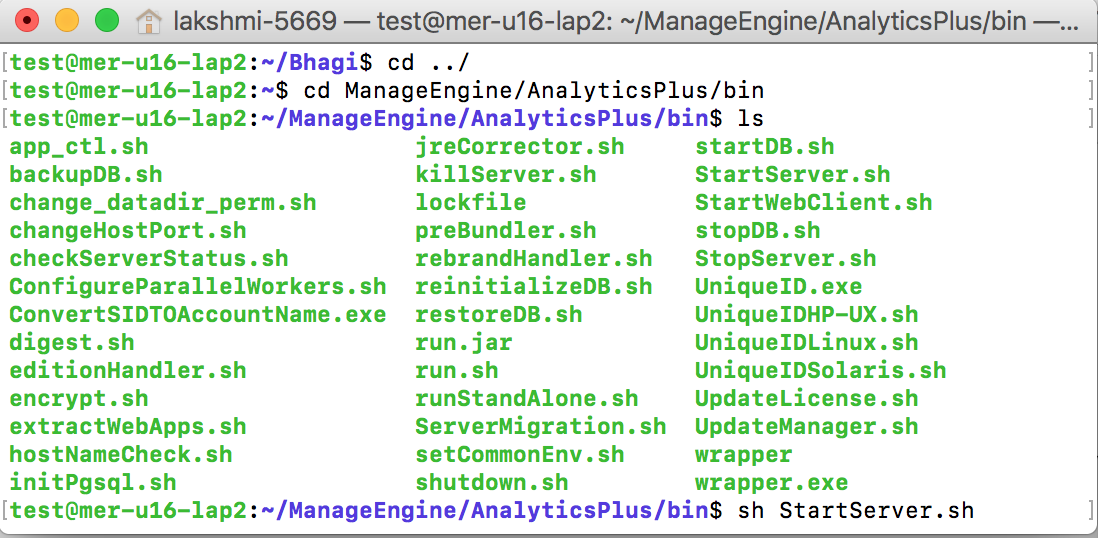
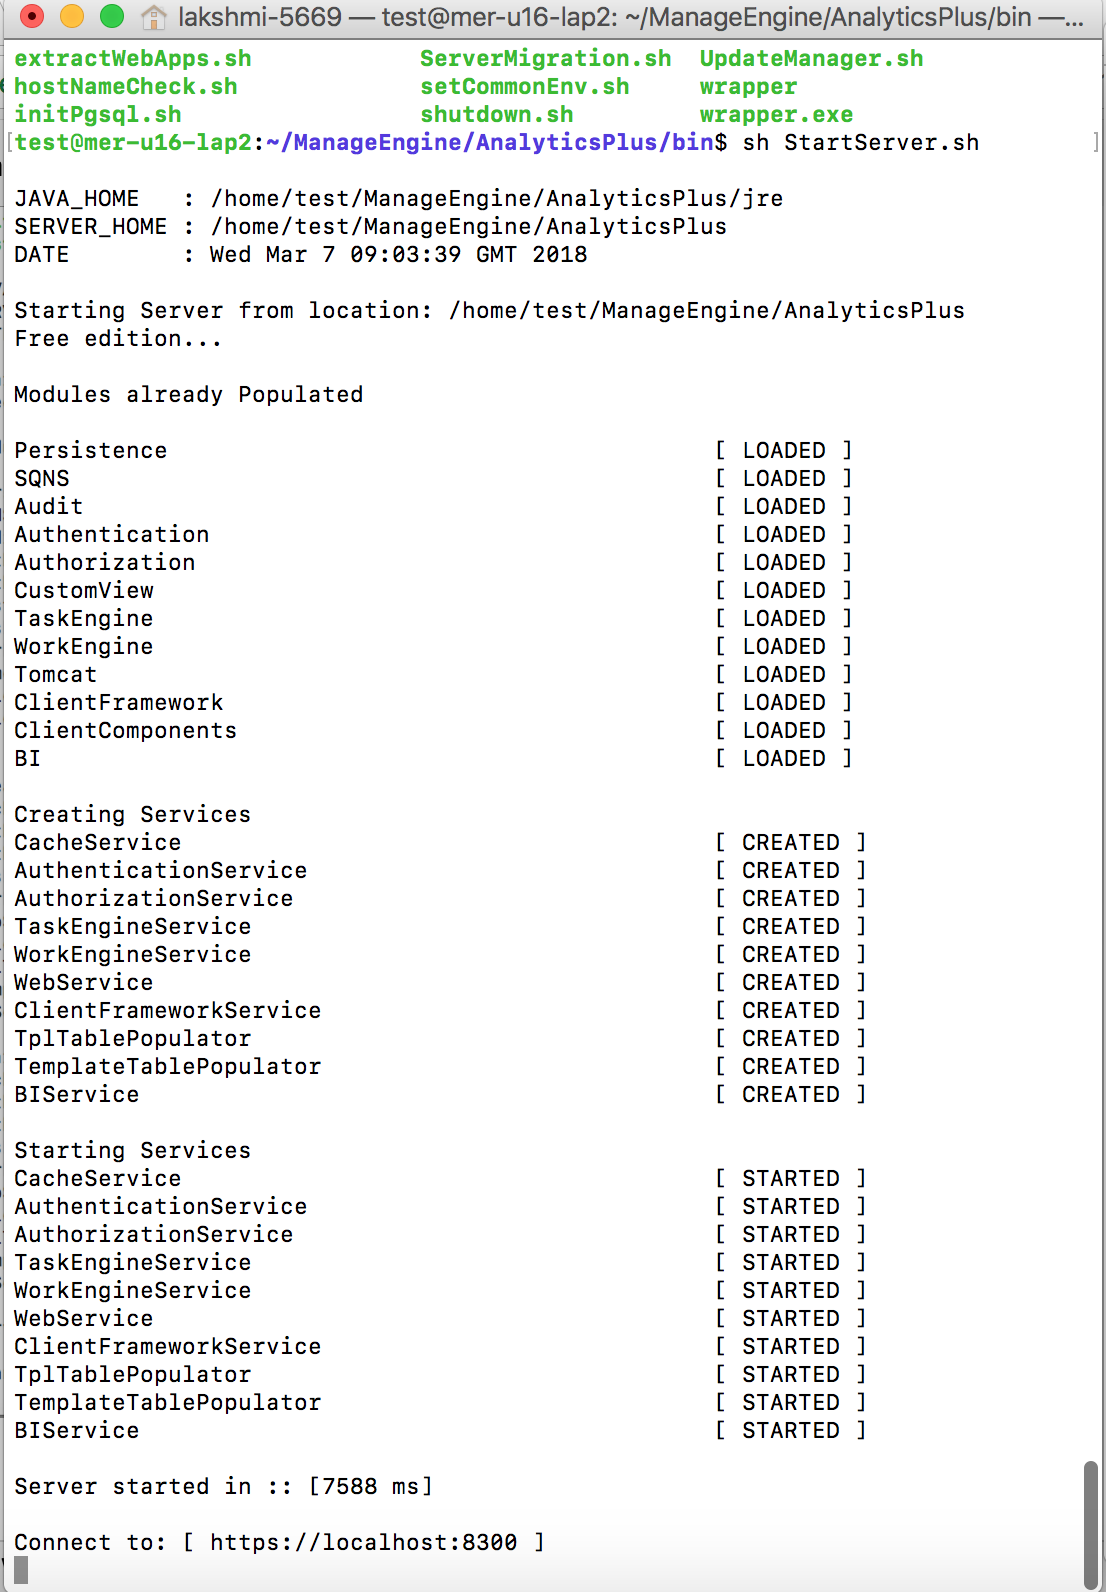
- To start the application, change the working directory to ManageEngine/AnalyticsPlus/bin and type sh StartServer.sh and hit Enter.
- It will take a few seconds to start up all the modules. Once the startup is complete, you'll see the the start up sequence as shown below. You can access the application using the URL- https://<Hostname>:<Web server port>. Replace <Hostname> tag with the hostname or IP address of the server and <Web server port> tag with the web server port chosen at the time of installation (Example- https://BI-server:8443).
Getting Started with Analytics Plus
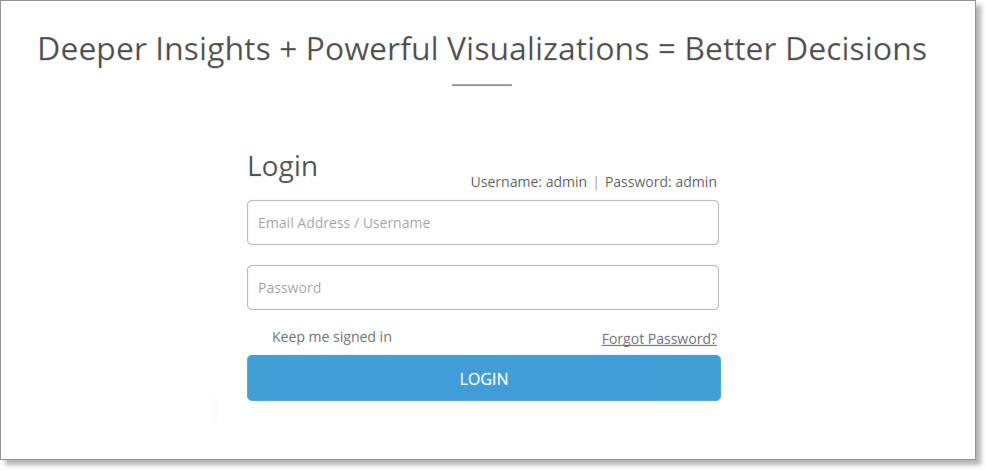
Once the installation is complete, the application will be launched in the browser. The default username is admin and the password is admin.
- Once you log into the application, enter the email address that is to be associated with the administrator account and click on Update Mail. You can also choose to change the language from the Language drop-down.

- The next step provides options for e-mail server configuration.

Specify the following details for server configuration.
- Specify the SMTP Server name and the Port number in respective fields.
- Specify the e-mail Address. This will be used as the Sender address for all system generated e-mails.
- Select the Requires authentication checkbox if your SMTP server Requires authentication details to send e-mails.
- Specify the Username and Password.
- Select the TLS enabled option if TLS is configured in your mail server.
- Select the SSL enabled option if your mailbox works in SSL mode.
- You can test the configured settings by clicking on the Test Primary Server Settings button.
- Click Save if the test is successful.
The SMTP server is configured and all the e-mails will be sent through this server.
The next window displays video tutorials. Click Finish to assess the Analytics Plus home page.
